Friday, January 29, 2010

Accessing a FTP Server from a Mac using Finder

In a couple of recent posts, I showed how to quickly set up a FTP on both a Mac (How To Set Up A FTP Server on a Mac) and a Ubuntu 9.04 desktop (How To Set Up A FTP Server on Ubuntu).  This post will show you how to access these or any other FTP servers using native Mac software .  If you are going to use ftp on a frequent basis, it is worth investigating what added capability and ease of use third-party software might provide.

Accessing a FTP Server from a Mac using Finder
1) Using Finder, click on the Go > Connect to Server (or using keyboard shortcut Command+K).
2) In the Server Address field, type in ftp://[ip address] and click Connect.
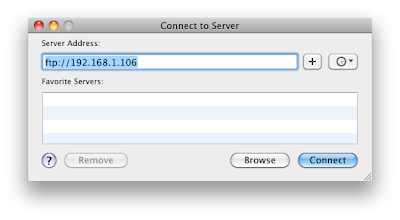
3) Enter your login and password.
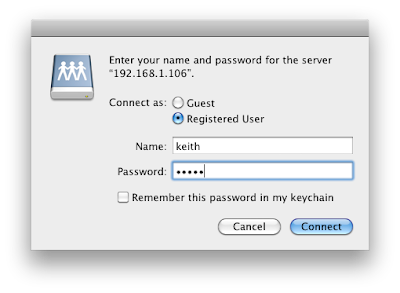
4) You are now successfully logged in! You can now drap and drop file to and from using the FTP connection. You will notice that the ftp server is now a shared drive in the Finder's left pane.


Note:
1) If instead you type in ftp://[username]@[ip address] in step 2, you will be taken to step 3 with the username filled in. For example ftp://keith@192.168.1.106.
2) If instead you type in ftp://[username]:[password]@[ip address] in step 1, you will be taken to step 5 directly. For example ftp://keith:keithpassword@192.168.1.106.

***However there is a huge restriction! You can only download from the ftp server. You CANNOT upload any files.

So what do you do if you need to upload, I will cover this in my next post.

Thursday, January 28, 2010

How To Set Up A FTP Server On Ubuntu

In a previous post, I covered how to set up a FTP Server on a Mac.  What can you do if you are running an Ubuntu desktop?  In this example I am running Ubuntu 9.04.

How to set up a FTP Server on Ubuntu 9.04
1)  Open a Terminal session. by selecting Application > Accessories > Terminal.
2)  Type sudo apt-get install vsftpd.  As you are using the sudo command, you will be prompted for a password.  Next, you will receive another prompt Do you want to continue [Y/n]?.  Type Y or you can just enter.


3)   You will now see a successful install.


4)  It is now time to configure the ftp server configuration file vsftpd.conf using gedit.  Type sudo gedit /etc/vsftpd.conf.  Make the following changes, save, and exit the editor

anonymous=NO
local_enable=YES
write_enable=YES

Be sure that there is no # sign in front of these statements.  The # sign will indicate that this is a comment.

5)  To reflect the changes made above, run the following command in Terminal:
sudo /etc/init.d/vsftpd start


6)  Done!  You can now start using your ftp server.

Wednesday, January 27, 2010

How To Set Up A FTP Server on a Mac

Have you ever been in a situation when you want to transfer some files and the best method is using FTP? Well, on both Leopard and Snow Leopard it is a breeze to set up a FTP Server! 

How to set up a FTP Server on Leopard or Snow Leopard
1)  Choose Apple Menu > System Preferences.
2)  Click the Sharing icon.
3)  Select the checkbox next to File Sharing in order to turn the service on.


4)  Click Options button.
5)  Select the checkbox Share files and folders using FTP.  Click Done.


6)  That's it!  You can start accessing your FTP Server now.

Tuesday, January 26, 2010

Default Router Passwords

Imagine you are helping a friend with an issue with their router, and decided the best course of action is to perform a hardware reset.  Without finding the manual, the easiest way to get the router password is to look online.

Here are 2 sites that have compiled these passwords:
1)  http://www.phenoelit-us.org/dpl/dpl.html
2)  http://routerpasswords.com

Monday, January 25, 2010

Taking Screenshots from Mac Terminal Session

Sometimes, it can be very useful to take screenshots in command line to be used when scripting.  You can use  screencapture to capture and manipulate clipboard contents.

The syntax is   screencapture [ -SWCTMPcimswxt ] file

Option
Option Description
-c
Force screen capture to go to the clipboard.
-C
Capture the cursor as well as the screen. Only allowed in non-interactive modes.
-i
Capture screen interactively, by selection or window. The control key will cause the screen shot to go to the clipboard. The space key will toggle between mouse selection and window selection modes. The escape key will cancel the interactive screenshot.
-m
Only capture the main monitor, undefined if -i is set.
-M
Open the taken picture in a new Mail message.
-o
In window capture mode, do not capture the shadow of the window.
-P
Open the taken picture in a Preview window.
-s
Only allow mouse selection mode.
-S
In window capture mode, capture the screen instead of the window.
-t
Image format to create, default is png (other options include pdf, jpg, tiff and other formats).
-T
Take the picture after a delay of , default is 5.
-w
Only allow window selection mode.
-W
Start interaction in window selection mode.
-x
Do not play sounds.

To take a screenshot of the entire screen and save it to the desktop,
screencapture -S ~/Desktop/screen.jpg

To take a picture of a window, and save it to the desktop;
screencapture -iW ~/Desktop/window.jpg

To take a screenshot of a section of the screen, and save it to the clipboard
screencapture -ic

Friday, January 22, 2010

Remote Desktop - Part 5 Are We Done Yet?

This has been a very pleasant surprise for me!  My original intent was to help get rid of the clutter under my desk, and what I ended  up with is being able to remote into any computer.  The fact that I only intend to use remote desktop strictly inside my home network made this exercise easy.

The table below summarizes what software is used to remote desktop from one operating system to another.

Windows systems include Windows XP Pro and Windows 7
Mac systems include Leopard and Snow Leopard
Linux systems include Ubuntu 9.04


To WindowsTo MacTo Linux
From WindowsWindows Remote DesktopVNC ViewerVNC Viewer
From MacMicrosoft Remote Desktop Client for Mac 2Mac OS X Screen SharingScreen Sharing App, Safari or Finder
From LinuxLinux Terminal Server ClientLinux Remote Desktop ViewerLinux Remote Desktop Viewer

That's it for now!  I expect there will be a few more things I may give a try like expanding this table to include servers, other Linux distros, secured access, screen sharing on a Mac using ichat, and remote desktop across the internet.

Thursday, January 21, 2010

Remote Desktop - Part 4 Getting Back to Linux

This post will document how to remote desktop back to my Linux systems from Windows, Mac and Linux system.

The first step is to configure the remote Linux system to allow remote access from another computer.

To Enable Remote Desktop to a Ubuntu 9.04 system,
1) Click System> Preferences > Remote Desktop.  This will present you with the Remote Desktop Preferences screen.


2) Select all the checkboxes under Sharing and Security.


The second step is to test the remote access from another computer to the configured Linux system.

Remote Access From Windows (XP Pro, 7) to Linux (Ubuntu 9.04)
1) Dowload TightVNC Viewer executable software for Windows that does not require installation.
2) Unzip and extract the vncviewer.exe file.
3) Double-click vncviewer.exe


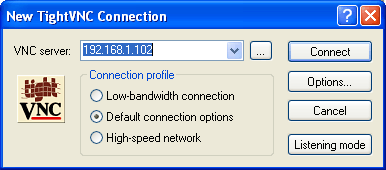
4) In the VNC server box, type in the name of the server or the IP address of the remote computer. Click Connect. Type in password prompted.


Remote Access From Mac (Leopard, Snow Leopard) to Linux (Ubuntu 9.0)
An easy solution is to install a Mac-friendly VNC Viewer like JollyFastVNC and this would surely work.  But, why install a VNC Viewer when Screen Sharing already is.  Here are 3 ways:

Screen Sharing app
1)  In Finder, navigate to the  hard drive > System > Library > Core Services > Screen Sharing.app.  Double-click it..
2)  Type in your Mac username and password

Safari
1)  Type vnc://  in the address bar.
2)  Type in your Mac username and password.

Finder
1)  Click Go > Connect to Server
2)  For the server address, type vnc://; and click Connect.
3)  Type in your Mac username and password.

Remote Access From Linux (Ubuntu 9.04) to Linux (Ubuntu 9.04)
1) Click Applications > Internet > Remote Desktop Viewer.
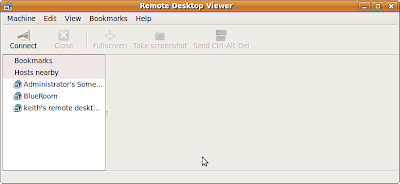
2) If your remote computer is in list under Hosts nearby, you can click it and type in the password..  If not, click Connect.  In the new windows, type in the name of the computer or the IP address and click Connect.


Wednesday, January 20, 2010

Remote Desktop - Part 3 Getting Back to Mac

This post will document how to remote desktop back to my Mac systems from Windows, Mac and Linux systems.

The first step is to configure the remote Mac system to allow remote access from another computer.

To Enable Screen Sharing to a Mac (Leopard, Snow Leopard)
1)  Select  > System Preferences.  Click Sharing.
2)  Select the Screen Sharing checkbox.


3)  Specify who can share your screen.  You have the option of All users or Only certain users.
4)  If you will be sharing your screen via VNC, then click Computer Settings.
5)  Select the checkbox VNC viewers may control screen with password and add a password of maximum length 8 characters.


The second step is to test the remote access from another computer to the configured Mac system..

Remote Access From Mac (Leopard, Snow Leopard) to Mac (Leopard, Snow Leopard)

Remote access between Macs is done using Screen Sharing.  Screen Sharing can be initiated in several ways.

I.....Screen Sharing

1)  Using Finder, other computers on your network should be listed under the Shared section in the left pane.
2)  Click on the Mac you want to connect to.
3)  Click the Share Screen button.


4)  Type in your Mac username and password, and click Connect.

II....Screen Sharing app

1)  In Finder, navigate to the hard drive > Library Core ServicesScreen Sharing.app Double-click it.
2)  Type in the name or the IP address of the computer.  You will be prompted for your Mac username and password.


III...Safari
1)  Type vnc:// in the address bar.
2)  Type in your Mac username and password.

IV....Finder
1)  Click Go > Connect to Server.
2)  For the server address, type vnc://<ip address> and click Connect
3)  Type in your Mac username and password.

Remote Access From Windows (XP Pro, 7) to Mac (Leopard, Snow Leopard)
1)  Dowload TightVNC Viewer executable software for Windows that does not require installation.
2)  Unzip and extract the vncviewer.exe file.
3)  Double-click vncviewer.exe


4)  In the VNC server box, type in the name of the server or the IP address of the remote computer.  Click Connect.  Type in password prompted.


Remote Access From Linux (Ubuntu 9.04) to Mac (Leopard, Snow Leopard)

1)  Click Applications > Internet > Remote Desktop Viewer.
2)  If your remote computer is in list under Hosts nearby, you can click it and type in the password..  If not, click Connect.  In the new windows, type in the name of the computer or the IP address and click Connect


Tuesday, January 19, 2010

Remote Desktop - Part 2 Getting Back to Windows

This post will document how to remote desktop back to my Windows systems from Windows, Mac and Linux systems.

The first step is to configure the remote Windows system to allow remote access from another computer.

To Enable Remote Desktop to a Windows XP Professional system,
1)  Click Start.
2)  Right-click My Computer, choose Properties.
3)  Select Remote tab.
4)  Select the checkbox Allow users to connect remotely to this computer.
5)  Click on Select Remote Users.  Confirm that the user you want to remote login with.
6)  If the Windows Firewall is ON, it will be automatically configured to allow Remote Desktop connection.

To Enable Remote Desktop to a Windows 7 system,
1)  Click Start.
2)  Right-click My Computer, choose Properties.
3)  Select Remote Settings in the left menu.
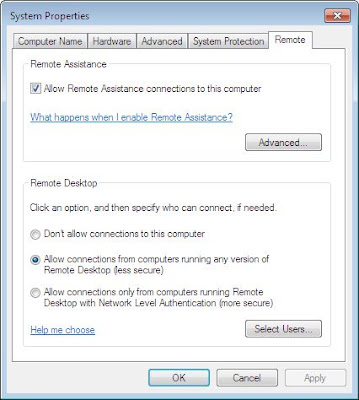
4)  Select the checkbox Allow connections from computers running any version of Remote Desktop (less secure).


5)  Click on Select Users.  Confirm that the user you want to remote login with.
6)  If the Windows Firewall is ON, it will be automatically configured to allow Remote Desktop connection.

The second step is to test the remote access from another computer to the configured Windows system..

Remote Access From Windows (XP Pro, 7) to Windows (XP Pro, 7)
1)  Click Start > All Programs > Accessories > Remote Desktop Connection.
2)  Type in the name or ip address of the remote computer.  Click Connect.


Remote Access From Mac (Leopard, Snow Leopard) to Windows (XP Pro, 7)
1)  Download and install the Remote Desktop Client for Mac 2 from Microsoft on your Mac.
2)  Click Applications > Remote Desktop Connection.
3)  Type in the name or ip address of the remote computer.  Click Connect.


My initial use of the Microsoft's Remote Desktop Client for Mac 2 was not problem-free.  After I installed the software on my Mac Mini, the RDP client looked familiar.  I was very surprised when my connection to a Windows XP desktop failed.  The message on the client side was not useful.  When I checked on the Windows XP side, I did notice in the event viewer that there was an application popup message indicating that \System\Root\System32\RDPDD.dll failed to load.  After doing some research it turned out that the culprit was the device driver for my NVIDIA GeForce 7100 GS video card. Nvidia published a few release of this device driver that broke remote desktop functionality.  Easy enough, I upgraded the drive to the most current and it WORKED!

Remote Access From Linux (Ubuntu 9.04) to Windows (XP Pro, 7)
1)  Click Applications > Internet > Terminal Server Client.
2)  Type in the name of the computer or the IP address, the username and the password.  Click Connect.


For other distros of linux, it is almost certain that Terminal Server Client will not be installed by default.    I will  explore how do so in a future post.

Part 1 - Remote Desktop - Say Bye-Bye to My KVM Switch
Part 2 - Remote Desktop - Connecting Back to Windows Systems

Monday, January 18, 2010

Remote Desktop - Part 1 Say Bye-Bye To My KVM Switch


It's time to say by-bye to my KVM switch!!  As much as I find using a KVM (ie. Keyboard-Video-Mouse) switch useful, I am often frustrated by the clutter of thick cables behind and under my desk.  I decided it was time to get rid of it and all the attached cables!  That's was easy!!

So what am I going to do now?  I have a mixture of Windows, Mac and Linux systems in my network.  As I build up and tear down systems on a regular basis, ideally I want to avoid having to install any third-party software.  My preference is to take advantage of what is built into each operating system.  Based on my previous experience, I fully expect that installing a VNC Viewer on Windows systems will be in order.  Hopefully that will be it!

I plan on documenting the procedure on how to remote in from any Windows, Mac or Linux system to any other.  My intention is to focus strictly on desktop systems.  So for Windows, it will be Windows XP Professional and Windows 7; for Mac, it will be Leopard and Snow Leopard; and for Linux, it will be Ubuntu 9.04 only.

I will present my findings as follows:
Part 2 - Remote Desktop - Connecting Back to Windows Systems
Part 3 - Remote Desktop - Connecting Back to Mac Systems
Part 4 - Remote Desktop - Connecting Back to Linux Systems
Part 5 - Remote Desktop - Windows, Mac, Linux Summary

Friday, January 15, 2010

How To Use Remote Disc On Any Mac

When MacBook Air Notebooks were introduced, a new feature called Remote Disc was introduced to allow access to a CD/DVD drive as the MacBook Air did not come with an optical drive.  You can now enable this feature on any Mac

How To Use Remote Disc On Any Mac:

On the Mac sharing the optical drive,
1)  Go to  > System Preferences.
2)  Click Sharing icon.
3)  Select the checkbox DVD or CD Sharing.

On the Mac using the Remote Disc,
1)  Open a Terminal Session and run both these commands
defaults write com.apple.NetworkBrowser EnableODiskBrowsing -bool true
defaults write com.apple.NetworkBrowser ODSSupported -bool true
2)  Reboot.
3)  Open  Finder.  You should see Remote Disc on the left under Devices.


This will give you read access to the optical drive.  You will not be able to use the driver as a burner.

To undo,
1)  Open a Terminal Session and run both these commands
defaults write com.apple.NetworkBrowser EnableODiskBrowsing -bool false
defaults write com.apple.NetworkBrowser ODSSupported -bool false
2)  Reboot.

Thursday, January 14, 2010

How to Change Screenshot Location in Snow Leopard

When you take a screenshot in Snow Leopard, the file is saved on your desktop by default.  If you are taking lots of screenshots, why clutter your desktop.  Wouldn't it be more productive if you have these screenshots placed into a folder of your choice.

To save screenshots to a specific folder by default,
1)  Open a Terminal session
2)  Enter the following
defaults write com.apple.screencapture location /Users/keith/Desktop/Screenshots
3)  You can restart or enter the following in the same Terminal session
killall SystemUIServer

Once you make this change, you need to restart your machine for the change to take effect. But once you do that, all future screenshots will be saved to the new location.

Wednesday, January 13, 2010

How To Enter GodMode in Windows 7

1)  CrWhat is "GodMode"?  GodMode is a one-stop access to all of the operating system's control panels.

How to Enter GodMode in Windows 7:
1)  Create a new folder anywhere.  I created at c:\

2)  Rename the folder to:
GodMode.{ED7BA470-8E54-465E-825C-99712043E01C}

3) Instead of the folder name, you should now see an icon named GodMode.


4) Double-click the folder to see all the configuration options.


It has been reported that this also works for Vista Business and Server 2008, but I have not confirmed. Some people have been reporting problems with the 64bit versions.

Tuesday, January 12, 2010

How to Change Screenshot Default File Format in Snow Leopard

When you take a screenshot in Snow Leopard, the file is saved as a .png by default.  This default is the same for Tiger and Leopard.  Suppose you wanted the file as a jpg, pdf, gif, tif, pict, bmp or some other format.  You can convert to another file format, but why?  Why not capture the screenshot in the format you want right from the start.

To save screenshots as a .jpg file by default,
1)  Open a Terminal session
2)  Enter the following
defaults write com.apple.screencapture type jpg
3)  You can restart or enter the following in the same Terminal session
killall SystemUIServer

Once you make this change, you need to restart your machine for the change to take effect. But once you do that, all future screenshots will be saved using the file format of your choice.

Monday, January 11, 2010

How To Install Jolicloud in VMware Fusion 3


I received an email a week ago from Jolicloud letting me know that Jolicloud has recently entered public Pre-beta.  As a registered Alpha tester, I never could find the time to install on my netbook.  Today, I am still not ready to mess with netbook, so I decided that I might as well install on VMware Fusion to get some hands on experience with it.  After searching a bit, I did not find any instructions of how to install.  As Jolicloud is based on Debian and Ubuntu, this should be fairly straightforward.....and it was!


For those of you who are not aware, Jolicloud was created to maximize the use of lower-powered and smaller screens of netbooks.

How To Install Jolicloud Pre-Beta in VMware Fusion 3:
1)  Download the Jolicloud Pre-Beta iso.
2)  From the VMware Fusion toolbar, select File > New.
3)  Click Continue without disc.

4)  Select Use operating system installation disc image file and then navigate to the Jolicloud Pre-Beta iso file, then click Continue.

5)  Choose Linux as the Operating System and Ubuntu as the version, and then click Continue.

6)  Click Customize Settings.

7)  Name your VM something appropriate.

8)  Click on Hard Disks settings and adjust the Disk size to 6GB, and click Apply.

9)  Click on Network and change to Bridged.

10)  Start the virtual machine with the Jolicloud Pre-Beta iso.

11)  Once Jolicloud has started, you may receive a CPU frequency scaling unsupported message.  Click OK.

12)  Double-click the Install icon on the desktop.

13)  Click Forward.

14)  Change timezone.  Click Forward.

15)  Click Forward.

16)  Click Forward.

17)  Add your name and password, and click Forward.

18)  Click Install.

19)  Install in progress.

20)  Once install is completed, click Restart Now.

21)  Disconnect your drive in settings and press Enter.

22)  Jolicloud on your hard drive is now booting.

23)  Enter your username.  Note that if you did not change the default, the username is jolicloud.

24)  Enter your password.

25)  You should now see the Jolicloud desktop.

26)  As a network connectivity test, I navigated to the jolicloud website.

27)  DONE!