Friday, April 30, 2010

French Grammar checking in OpenOffice

In my last post, I showed an example of French grammar checking in TextEdit.  I am going to use the same example in OpenOffice.


For my trivial test, I am going to use a simple sentence.  The sentence I will use is  Je veux verifier mon grammaire.  The corrected sentence should be Je veux vérifier ma grammaire.

1)  After typing this sentence into TextEdit, this is what is shows:
2)  You can go to Tools > Spelling and Grammar.  Instead, I click English (Canada) option at the bottom and then switch to French (Canada).  No change yet.

3)  Click the Spelling and Grammar icon.
4)   Go to Tools > Spelling and Grammar.

5)  The first correction suggested is correct.  So I click Change.
6)  Unfortunately, it did not suggest any changes.  This is the same result as with TextEdit.  Now that I got the same results with both these editors, I thought I should try a similar experiment in English.  As it turns out, the grammar checking is not much better in English!


Wednesday, April 28, 2010

French Grammar checking in TextEdit

As my daughter is starting to using text editors more for her school work, I thought I would investigate how well they handle French grammar and spell checking.  Today, I am starting with the TextEdit that we all have installed on our Macs.

For my trivial test, I am going to use a simple sentence.  The sentence I will use is  Je veux verifier mon grammaire.  The corrected sentence should be Je veux vérifier ma grammaire.


1)  After typing this sentence into TextEdit, this is what is shows:
2)  I next go the menu above  Edit > Spelling and Grammar >  Show Spelling and Grammar.  A new windows pops up.

3)  The first spelling mistake is caught and a correct spelling is suggested.  So I choose the first suggestion, and then click change.  The change should now be reflected in the document.
4)  TextEdit did NOT catch the 2nd error!  Well, at least it caught the spelling mistake.

Monday, April 26, 2010

How to Disable Remote Control Infrared Receiver

In one our rooms, we have 2 Mac Minis.  Often when we are using the remote to navigate in Front Row on one Mac, the remote will also affects the other one.  As we do not need use of the remote on the other Mac, a good solution for us is to just disable the IR receiver.

To disable the IR receiver,

1)  Go to System Preferences, and click on Security.

2)  Switch to the General tab.

3)  Click on the Lock icon at the bottom left if is not already open.  You will need to enter your password to allow changes.

4)  Select the checkbox for Disable remote control infrared receiver.  Don't forget to click on the lock to prevent inadvertent changes.
5)  That's it!

Friday, April 23, 2010

My Own ESXi Server Part 17 Increasing Size of Virtual Disk

At some point, you will run into a situation where one of your disks is running a bit low on space, and you want to increase to accommodate future growth.

How to Increase Size of Disk:

1)  Using VMware Sphere Client, right-click on the virtual machine you want to increase the disk size and click Edit Settings.

2)  Select Hard Disk.  Adjust the size of the disk and click OK.


3)  That's it from the VMware perspective!  The next step is for the guest operating system to reflect the change in disk size.  To do so, you will need some partitioning software that supports your operating system.  To continue with this example, we will increase the partition size of a Windows 2003 system using the open source software GParted.

As I already had a burned copy of GParted, I will need to boot from the CD.  To get the virtual machine to boot from the CD, I need to make one change to the bios.  Still in the Edit Settings, switch to the Options tab.  Select Boot Options, and check Force BIOS Setup and click OK.


4)  When the virtual machine is booted next, change the boot option to ensure it boots from the CD.

5)  If bios change was done correctly, you should boot off the CD into GParted.  Right-click on dev/sda1 ntfs partition, and choose Resize/Move.


6)  Increase the partition until it takes there is no free space.  Click Resize.


7)  Your partition should now show the increased size.


8)  Nothing has been done yet.  All you have done is enter the new proposed configuration.  Click Apply.


9)  Click Close once complete.


10)  You should now see the update partition configuration.


11)  Be sure to remove your Gparted or other CD/DVD before you reboot your system.

12)  That's it!

Wednesday, April 21, 2010

My Own ESXi Server Part 16 Adding a License Key

How to Add a License Key to VMware ESXi:

1)  While logging into vSphere Client, you get a message indicating that the VMware Evaluation ESXi license will expire.  Click OK.


2)  From the main vSphere Client window, switch to the Configuration tab.


3)  Under Software, click on Licensed Features.  Click Edit (upper right corner of screen) to change the ESX Server License Type.


4)  Check Assign a new license key to this host and click  Enter key.... button.


5)  Enter your license key you obtained from VMware and click OK.


6)  That's it!

Related Posts:
Part 1  The Time Has Come
Part 2  Running ESXi on VMware Fusion
Part 3  Building My ESXi Server
Part 4  Installing ESXi 4 on a USB Stick
Part 5  Installing vSphere Client on Windows
Part 6  Updating ESXi using vSphere Host Update Utility
Part 7  Browsing the VMware ESXi Datastore
Part 8  WinSCP to the Rescue
Part 9  Creating a VM
Part 10  Downloading a Virtual Machine
Part 11  Running vSphere Client from Ubuntu
Part 12  Running vSphere Client from Mac OS
Part 13  Adding/Removing a VM to ESXi
Part 14  Export in ESXi
Part 15  Deploying OVF Templates
Part 16  Adding a License Key

Monday, April 19, 2010

Disabling Windows 2003 Shutdown Tracker

I have always found the Windows 2003 Shutdown Tracker extremely annoying.  Definitely I have no interest in using this in my home network.

How to Disable Windows 2003 Shutdown Tracker:

1)  Click Start > Run.

2)  In the Run box type "gpedit.msc"

3)  You will need to expand some of the folders by clicking on the + sign.  Go to Local Computer Policy > Computer Configuration > Administrative Templates > System


4)  Double click Display Shutdown Event Tracker and select the Disabled checkbox and press OK


5)  That's it!

Friday, April 16, 2010

My Own ESXi Server Part 15 Deploying OVF Templates

In Part 14, I covered how to Export an OVF Template from an existing virtual machine.  Once you have created that template, you can now deploy as needed.  Before an OVF file is imported, the vSPhere Client validates the file and ensures that it is compatible with that version of VMware ESXi.

How to Deploy an OVF Template

1)  In the vSphere Client, select File > Deploy OVF Template.

2)  Specify the location of the template file


3)  Review the OVF Template Details page and click Next.


4)  Specify a name for the Virtual Machine and click Next.


5)  Click Finish.


6)  That's it!  It took about 20 minutes and then the new virtual machine will show up in vSphere Client list.

Related Posts:
Part 1  The Time Has Come
Part 2  Running ESXi on VMware Fusion
Part 3  Building My ESXi Server
Part 4  Installing ESXi 4 on a USB Stick
Part 5  Installing vSphere Client on Windows
Part 6  Updating ESXi using vSphere Host Update Utility
Part 7  Browsing the VMware ESXi Datastore
Part 8  WinSCP to the Rescue
Part 9  Creating a VM
Part 10  Downloading a Virtual Machine
Part 11  Running vSphere Client from Ubuntu
Part 12  Running vSphere Client from Mac OS
Part 13  Adding/Removing a VM to ESXi
Part 14  Export in ESXi
Part 15  Deploying OVF Templates
Part 16  Adding a License Key

Wednesday, April 14, 2010

My Own ESXi Server Part 14 Export in ESXi

One of the tremendous benefits of using VMware is the ability to provision virtual machines very quickly. To facilitate that process, there is Export functionality that allows you to preserve a virtual machine as a template to be used in the future. One example could be to preserve a base OS installation with all the latest patches installed.

The Export functionality preserves the templates in OVF format.

To Export an OVF Template:

1)  Select the virtual machine and select File > Export > Export OVF Template.

2)  Complete the Export OVF Template window.
a)  You can specify whatever name you want for the template.
b)  The directory specified will be a location available to the vSphere Client and not the datastore browser.
c)  In the Optimized for field, determine how you want to store the files.
Select Web (OVF) to store the OVF template as a set of files (.ovf, .vmdk, and .mf) This format is
optimal if you plan to publish the OVF files on a web server or image library. The package can be
imported, for example, into the vSphere client by publishing the URL to the .ovf file.
Select Physical Media (OVA) to package the OVF template into a single .ova file. This might be
convenient to distribute the OVF package as a single file if it needs to be explicitly downloaded from
a web site or moved around using a USB key.
d)  Select the checkbox for Create folder for OVF template.
e)  Fill in any description that will be of value later.

Click OK


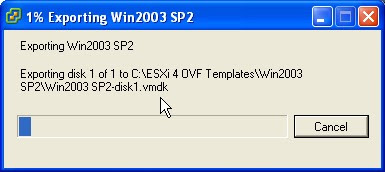
 3)  The Export process took about 20 minutes.


4) That's it! Once it is done, you should see a folder in the directory you specified with the template.

Related Posts:
Part 1  The Time Has Come
Part 2  Running ESXi on VMware Fusion
Part 3  Building My ESXi Server
Part 4  Installing ESXi 4 on a USB Stick
Part 5  Installing vSphere Client on Windows
Part 6  Updating ESXi using vSphere Host Update Utility
Part 7  Browsing the VMware ESXi Datastore
Part 8  WinSCP to the Rescue
Part 9  Creating a VM
Part 10  Downloading a Virtual Machine
Part 11  Running vSphere Client from Ubuntu
Part 12  Running vSphere Client from Mac OS
Part 13  Adding/Removing a VM to ESXi
Part 14  Export in ESXi
Part 15  Deploying OVF Templates
Part 16  Adding a License Key

Monday, April 12, 2010

Secrets - Hidden Settings for Mac

I wish I knew Secrets when I first started to use my Mac.  For a geek like me, it provides a tremendous amount of tweaking options all in one place.  It saves having to remember or look up infrequently used Mac configurable settings using Terminal.


Explore and I hope you find some useful tweak!

Friday, April 9, 2010

Evernote

Evernote is probably the application I use most frequently. I use Evernote to capture and organize all kinds of data all in one spot.  By far the majority of content is articles from the web I want to keep for later reference.  One of the key features for me is the ability to access it from any computer I want.  The data is kept both locally and in the cloud.

While tagging is available, I find it far more useful to organize by notebooks.  As I add more and more content, I continue to add additional notebooks keeping each notebook a manageable size for me.

I have been using Evernote for over a year now, and have not needed to upgrade from the ad-supported free account.

Thursday, April 8, 2010

AppFresh

If you are like me and like to install lots of software on you Mac, then you certainly need AppFresh.  AppFresh will help you keep all your applications, widgets, preference panes and application plugins up to date.


By default, the main screen will display all the software that has updates available. As you can see I have some software listed more than once e.g. Acorn. The scan was so complete that it even scanned my attached Drobo. As you select each item, you can see where the software is located at the bottom of the screen. For each selection you can also right-click, and Install. For the most part, this worked but not always.

Wednesday, April 7, 2010

Diskutil command

diskutil is a Mac OS X command that provides information about, and allows the administration of, the partitioning scheme of disks, optical discs, and AppleRAID sets.

One example is run the command diskutil list in Terminal.  The result is a list of all disks and all of their partitions are listed.


In the example above:

disk0 is the hard drive in my Mac Mini
disk1 is the attached Drobo
disk2 is the dvd.

Here are some other examples taken from the Man Pages:

Erase a disk
diskutil eraseDisk UFS UntitledUFS disk3

Erase a volume
diskutil eraseVolume HFS+ UntitledHFS /Volumes/SomeDisk

Partition a disk with three partitions
diskutil partitionDisk disk3 3 HFS+ Untitled 10G UFS UntitledUFS 10G MS-DOS DOS 10G

Partition a disk with the APM partitioning scheme
diskutil partitionDisk disk3 APM HFS+ vol1 25% Journaled HFS+ vol2 25% Journaled HFS+ vol3 50% Free Space volX 0%

Partition a disk with the GPT partitioning scheme
diskutil partitionDisk disk3 GPT HFS+ vol1 25% MS-DOS vol2 25% HFS+ vol3 50% Free Space volX 0%

Resize a volume and create a volume after it, using all remaining space
diskutil resizeVolume /Volumes/SomeDisk 50g MS-DOS DOS 0b

Resize a volume and leave all remaining space as unused
diskutil resizeVolume /Volumes/SomeDisk 12g

Merge two partitions into a new partition
diskutil mergePartitions JHFS+ not disk1s3 disk1s5

Split a partition into three new ones
diskutil splitPartition /Volumes/SomeDisk JHFS+ vol1 12g MS-DOS vol2 8g JHFS+ vol3 0b

Create a RAID
diskutil createRAID mirror MirroredVolume JHFS+ disk1 disk2

Destroy a RAID
diskutil destroyRAID /Volumes/MirroredVolume

Repair a damaged RAID
diskutil repairMirror /Volumes/MirroredVolume disk3

Convert volume into RAID volume
diskutil enableRAID mirror /Volumes/ExistingVolume

If seeing all these examples makes you nervous, then stick with the Disk Utility gui app!

Tuesday, April 6, 2010

Taking Screenshots with Preview

I have previously covered taking screenshots using keyboard shortcuts, from terminal, and Snagit for Mac. I recently found another way using Preview that I was not aware.  Not only that, but you can also annotate.


With Preview open, you can take a screenshot by clicking on File > Take Screen Shot and then choosing one of From Selection, From Window or From Entire Screen.  I took the above screenshot using the From Entire Screen option.  Then using Preview, I cropped what I wanted to show.  As I mentioned you can also annotate the image, and then save it in a file format of your choice.

Monday, April 5, 2010

Exposé Active Screen Corners

If you are not already using Exposé Active Screen Corners, you should. This is my setup:


When I move the mouse to,

the top right corner, all the windows are displayed as thumbnails and I can quickly select the window I want to work in.

the top left corner, all windows move away and I can see just the desktop.

the bottom right corner, I see the only the windows for the currently application being worked on.

the bottom left corner, all the spaces are shown.

If you don't like my setup, you can also specify Dashboard, Start Screen Saver, Disable Screen Saver, and Put Display to Sleep.

Thursday, April 1, 2010

Fixing a Logitech MX Revolution Mouse that won't Charge

This week my Logitech MX Revolution mouse stopped charging.  When placed in the cradle it would flash green for a few seconds indicating it was charging, but then red for a few seconds.  After doing a little research, I decided to clean the contacts.  First I scraped them and then cleaned with rubbing alcohol.  This seemed to helped, but placing the mouse on and off the cradle a couple of times, the red flashing started again.


Back to the drawing board!  I saw a post where someone SLAMMED their mouse and it worked.  Hmm....strangely enough other users indicated they had similar luck!  Well, what did I have to lose?
Believe it or not, it WORKED for me!  Not only that, but it was extremely therapeutic!  My guess is that SLAMMING the mouse likely shifted the battery inside allowing for better contacts.