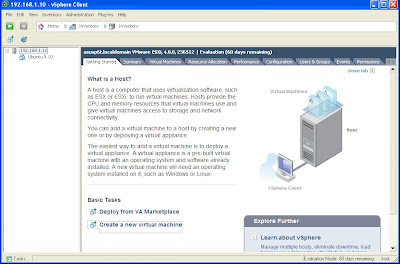
How to Create a Virtual Machine
1) From the main window of vSphere Client, click Create a new virtual machine.
2) On the Configuration, click Next.
3) Change the name of VM as you see fit and click Next.
4) If you have multiple datastores to choose, select one and click Next.
5) Select Guest Operating System and then Version, and click Next.
6) Adjust the Virtual disk size and click Next.
7) Check Edit the virtual machine settings before completion and click Continue.
8) Select New CD/DVD.
9) Check Connect at power on. Check Datastore ISO File and click Browse.
10) Browse datastore to location of the already uploaded iso and click OK.
11) Click Finish.
12) You should now see your VM listed in the inventory. Please note that you still have to install the operating system. Start the VM by selecting it and right-click and select Power > Power On. You will need to look at the Console to see the actual screen.

13) If you completed the OS installation, you should now have you first VM ready to use!
Related Posts:
Part 1 The Time Has Come
Part 2 Running ESXi on VMware Fusion
Part 3 Building My ESXi Server
Part 4 Installing ESXi 4 on a USB Stick
Part 5 Installing vSphere Client on Windows
Part 6 Updating ESXi using vSphere Host Update Utility
Part 7 Browsing the VMware ESXi Datastore
Part 8 WinSCP to the Rescue
Part 9 Creating a VM
Part 10 Downloading a Virtual Machine
***Updated March 26th 2010
I have decided to continue the series with at least the following:
Part 11 Running vSphere Client from Ubuntu
Part 12 Running vSphere Client from Mac OS
Part 13 Adding/Removing a VM to ESXi
Part 14 Export in ESXi
Part 15 Deploying OVF Templates
Part 16 Adding a License Key


No comments:
Post a Comment