Friday, June 4, 2010
Lyrics for iTunes
I recently added a few albums to iTunes and wanted to add the lyrics. The applications and widgets I used in the past no longer works. I did manage to find a dashboard widget for my Mac called TunesTEXT. I was really impressed with it. It managed to find lyrics for lots of songs that I could not previously find before. Give it a try!
Wednesday, June 2, 2010
Weak Cable Modem Signal
Recently I encountered a problem where the link from my ISP to the cable modem was not working. A technician from Rogers determined it to be an issue with cable from the curb to my house. After he resolved, he mentioned that the signal to my cable modem was weaker than it should be. Since he was willing, I took the opportunity to discuss a few things with him.
In all likelihood, the weak signal is due to the extremely cable long run from across the basement where the cable line comes in and up to the 2nd floor and then across another room. The technician also said another factor could be the cable itself (over 15 years old). I decided that I should try to do something about this.
The first thing I wanted to do is relocate the cable modem to the basement to reduce the cable run. As I wanted to maintain a wireless presence upstairs, I needed to introduce a 2nd router. My plan was to have the routers each connected to a gigabit switch and the switches would be connected to complete the network.
Here is what I did:
Basement Router
- connect the cable modem to the WAN port of the router
- set the IP address to 192.168.1.1
- set up DHCP server
- optionally set up wireless with exactly the same settings as the upstairs router
- connect the router to the basement gigabit switch
Upstairs Router
- the WAN port should be empty
- set the IP address to 192.168.1.2
- set the gateway address to be 192.168.1.1
- disable DHCP server
- leave existing setting for wireless
- connect the router to the upstairs gigabit switch
- make sure the gigabit switches are connected
The setup works for me. When I checked my cable modem (192.168.100.1), I can see that the signal to noise ratio and the power level have improved. Unfortunately I did not plan ahead to test the real speed to the computers upstairs. Even though the ISP cable run is shorter, my network cable run is longer.
The next step is for me to replace some of the old cables.
Friday, May 28, 2010
Hidden Files on Your Mac
As the Mac OS has its heritage in BSD, many of the features work the same way. For example, if you name a file starting with a ".", it behaves as if it is hidden. When we use Finder, by default it does not show any of these files. Unless you are really geeky, you have no real reason to want to see all these files.
Let's take a closer look:
1) Here is a snapshot of a directory
 2) Open a Terminal session and enter the commands below
defaults write com.apple.finder AppleShowAllFiles true
killall Finder
3) Finder will close and re-opens. The directory now looks like this
 4) You can see both hidden directories and files.
5) To restore back, enter the commands below in a Terminal session
6) That's it! Now all you need to do if figure out how to use this to your advantage.
Let's take a closer look:
1) Here is a snapshot of a directory

defaults write com.apple.finder AppleShowAllFiles true
killall Finder
3) Finder will close and re-opens. The directory now looks like this

5) To restore back, enter the commands below in a Terminal session
defaults write com.apple.finder AppleShowAllFiles false
killall Finder
6) That's it! Now all you need to do if figure out how to use this to your advantage.
Wednesday, May 26, 2010
Resize Photos using Automator
To quickly resize pictures for my Culinary Aspiration blog, I have to resize photos all the time. To be more productive, I use Automator to help me.
To set up the Automator workflow to resize photos:
1) Start Automator
2) Select Workflow template.

3) From the left column, select Files & Folders.

4) Drag Ask for Finder Items over to the right pane.

5) Update the Prompt to "Choose the Images to Resize", and select the checkbox for Allow Multiple Selection.

6) From the left column, select Photos, and then drag Scale Images over to the right pane.
7) Click Add to confirm that image files will be passed into this step.

8) Change the pixel size as appropriate.

9) Click File > Save As. Type in Resize photos to 480 pixels for the name and click Save.
10) All you need to do is open Automator with this workflow. Click Run and follow the prompts!
Friday, May 21, 2010
Converting From DOC to PDF on a Mac
Recently I opened up a Microsoft Word document in OpenOffice on my Mac. Possibly due to the formatting, it took over a minute to open up. As this was a document I wanted re-open in the future, I was not going wait each time. Within OpenOffice, there is an option to allow you to any file as a PDF. After doing this, the PDF opens almost instantly.
Wednesday, May 19, 2010
Troubleshooting Client Network Connection Problems
How to resolve client network connection problem:
1) Take a quick look at the physical connection to ensure the cat 5 cable is properly connected. On some laptops, you will see a flashing light indicating some level of connectivity.
2) Using a command window, type in ipconfig /all. The results should look something like this.

3) The physical connection for the ethernet adapter is the last one called Realtek. The other ones are for VMware server that I am also running. Note that in this instance this workstation is not using DHCP. The ip address being used is 192.168.1.91 and the gateway is 192.168.1.1. This means I am using a static ip rather than one being dynamically issued by a DHCP server. If I was using a DHCP server, the only difference you might is that DHCP is enabled with all the rest being the same. You may want to confirm if this is the correct DHCP server. For example if you are using a wireless connection, it is possible for you to connect to a router other than the one you are expecting.
4) Assuming there is no issue with the DHCP server and what IP address, subnet mask, default gateway and DNS servers being issued there are a few other checks to be made.
a) Ping 127.0.0.1 This is the localhost address and will work if TCP/IP stack is OK. If this fails, you should re-install TCP/IP.
b) Ping the local address. In my example, this would be ping 192.168.1.91. This will confirm the IP address for the client has successfully been bound to the physical card. If this fails, either the drivers for the network card is problematic or the network card itself is failing or has failed. I would first try to re-install the drivers.
c) Ping default gateway. In my example, this would be ping 192.168.1.1. This will help confirm the connectivity to another device in your network. If this fails, check the physical connections including the cable itself from the client to the default gateway device.
d) If there are other intermediate devices such as a switch, you will need to investigate. Commands such as tracert could be useful.
e) Ping remote IP address. If you are debugging a problem at home, the next IP address I would ping is the cable modem. For me, I know the IP address is 192.168.100.1. If you can get to that, I could try the ISP gateway. In my example the IP address is 64.71.255.198. From here, you could try other ones you know.
Monday, May 17, 2010
Viewing PPT Files on Your Mac
You have started using your Mac a lot more, and now you are trying to open a .ppt file created using Microsoft Powerpoint. You don't have Microsoft Office Suite installed on your Mac. What do you do? Little did I know that I already had one ready to go. The solution turned out to be OpenOffice. There may be better solutions out there as I did not research, but this is satisfactory for now as I only need to view this one file.
Friday, May 14, 2010
Lego Mindstorms on Snow Leopard
It has been a few months since the kids have used the Lego Mindstorms. Today, we gave it a try, but I needed to re-install the Lego Mindstorms application. However this time I needed to install on Snow Leopard. It appeared to complete the install OK, but there was no app in the Applications folder. After doing a quick search, I found a workaround on the NXT STEP - LEGO MINDSTORMS NXT Blog that worked!
Here are the steps copied from the blog:
1) Copy the contents of the installation CD onto the Desktop
2) Open the copied folder and look under "Parts". Under Parts, location the "MindstormsUnivEdu.pkg" (if you are trying to install the Educational version) or "MindstormsUnivRet.pkg" (if you are working from the Retail install CD).
3) Control-click (or right-click, if you have a two-button mouse) on the package, and choose "Show Package Contents" from the pop-up menu. This allows you to poke about in the normally "sealed" installation package.
4) Go into the revealed Contents/Resources directory and delete the "preflight" file (toss it in the trash)
5) Close this package and then run it like a normal install from this modified version on your desktop. Mindstorms NXT should install properly.
Have fun!
Wednesday, May 12, 2010
Paste and Match Style
When you copy a clip from a website or another document into a document you are working on, you often get a mixture of styles. To get around this, in most applications you can go to Edit > Paste and Match Style. The shortcut is Command+Option+Shift+v.
Monday, May 10, 2010
Using a Windows Keyboard With a Mac
For a novice user, using a Windows keyboard with a Mac can be quite confusing. Back when I first started using a Mac, I recall there were 3 keys that caused the most problems when trying to follow instructions. Here is the keyboard mapping for those 3 keys.
| Mac Key | Windows Key |
|---|---|
| Control | Ctrl |
| Option | Alt |
| Command (looks like a four leaf clover) | Windows |
Friday, May 7, 2010
Put Your Display to Sleep on a Mac
To put your display to sleep on a Mac, press Control+Shift+Eject button. This is similar to putting your Mac to sleep. Moving your mouse or pressing any key will wake the display up. If you are using a non-Apple keyboard, they may not work.
An alternative is to use Exposé with one of the active corners set to Put Display to Sleep. This will put the display to sleep whenever your move the mouse to that corner.
An alternative is to use Exposé with one of the active corners set to Put Display to Sleep. This will put the display to sleep whenever your move the mouse to that corner.
Wednesday, May 5, 2010
Put Your Mac to Sleep
The quickest way to put your Mac to sleep is to press Command+Option and then hold the Eject button for about 2 seconds.
Monday, May 3, 2010
Exposé Tip
Quite often, I trigger the All Windows option using Exposé to select the next window I want to work in. Some of the windows at the bottom can be quite small and the description is not enough. If you hover over the window you want to examine and hit the spacebar, the window will appear much larger. If that is not the window you are interested in, you can hit the spacebar again for it to shrink.
Friday, April 30, 2010
French Grammar checking in OpenOffice
In my last post, I showed an example of French grammar checking in TextEdit. I am going to use the same example in OpenOffice.


For my trivial test, I am going to use a simple sentence. The sentence I will use is Je veux verifier mon grammaire. The corrected sentence should be Je veux vérifier ma grammaire.
1) After typing this sentence into TextEdit, this is what is shows:

2) You can go to Tools > Spelling and Grammar. Instead, I click English (Canada) option at the bottom and then switch to French (Canada). No change yet.

3) Click the Spelling and Grammar icon.

4) Go to Tools > Spelling and Grammar.

5) The first correction suggested is correct. So I click Change.

6) Unfortunately, it did not suggest any changes. This is the same result as with TextEdit. Now that I got the same results with both these editors, I thought I should try a similar experiment in English. As it turns out, the grammar checking is not much better in English!
Wednesday, April 28, 2010
French Grammar checking in TextEdit
As my daughter is starting to using text editors more for her school work, I thought I would investigate how well they handle French grammar and spell checking. Today, I am starting with the TextEdit that we all have installed on our Macs.
For my trivial test, I am going to use a simple sentence. The sentence I will use is Je veux verifier mon grammaire. The corrected sentence should be Je veux vérifier ma grammaire.
1) After typing this sentence into TextEdit, this is what is shows:
 2) I next go the menu above Edit > Spelling and Grammar > Show Spelling and Grammar. A new windows pops up.

3) The first spelling mistake is caught and a correct spelling is suggested. So I choose the first suggestion, and then click change. The change should now be reflected in the document.
 4) TextEdit did NOT catch the 2nd error! Well, at least it caught the spelling mistake.
For my trivial test, I am going to use a simple sentence. The sentence I will use is Je veux verifier mon grammaire. The corrected sentence should be Je veux vérifier ma grammaire.
1) After typing this sentence into TextEdit, this is what is shows:


3) The first spelling mistake is caught and a correct spelling is suggested. So I choose the first suggestion, and then click change. The change should now be reflected in the document.

Monday, April 26, 2010
How to Disable Remote Control Infrared Receiver
In one our rooms, we have 2 Mac Minis. Often when we are using the remote to navigate in Front Row on one Mac, the remote will also affects the other one. As we do not need use of the remote on the other Mac, a good solution for us is to just disable the IR receiver.
To disable the IR receiver,
1) Go to System Preferences, and click on Security.
2) Switch to the General tab.
3) Click on the Lock icon at the bottom left if is not already open. You will need to enter your password to allow changes.

4) Select the checkbox for Disable remote control infrared receiver. Don't forget to click on the lock to prevent inadvertent changes.
 5) That's it!
To disable the IR receiver,
1) Go to System Preferences, and click on Security.
2) Switch to the General tab.
3) Click on the Lock icon at the bottom left if is not already open. You will need to enter your password to allow changes.

4) Select the checkbox for Disable remote control infrared receiver. Don't forget to click on the lock to prevent inadvertent changes.

Friday, April 23, 2010
My Own ESXi Server Part 17 Increasing Size of Virtual Disk
At some point, you will run into a situation where one of your disks is running a bit low on space, and you want to increase to accommodate future growth.
How to Increase Size of Disk:
1) Using VMware Sphere Client, right-click on the virtual machine you want to increase the disk size and click Edit Settings.
2) Select Hard Disk. Adjust the size of the disk and click OK.

3) That's it from the VMware perspective! The next step is for the guest operating system to reflect the change in disk size. To do so, you will need some partitioning software that supports your operating system. To continue with this example, we will increase the partition size of a Windows 2003 system using the open source software GParted.
As I already had a burned copy of GParted, I will need to boot from the CD. To get the virtual machine to boot from the CD, I need to make one change to the bios. Still in the Edit Settings, switch to the Options tab. Select Boot Options, and check Force BIOS Setup and click OK.

4) When the virtual machine is booted next, change the boot option to ensure it boots from the CD.
5) If bios change was done correctly, you should boot off the CD into GParted. Right-click on dev/sda1 ntfs partition, and choose Resize/Move.

6) Increase the partition until it takes there is no free space. Click Resize.

7) Your partition should now show the increased size.

8) Nothing has been done yet. All you have done is enter the new proposed configuration. Click Apply.

9) Click Close once complete.

10) You should now see the update partition configuration.

11) Be sure to remove your Gparted or other CD/DVD before you reboot your system.
12) That's it!
Wednesday, April 21, 2010
My Own ESXi Server Part 16 Adding a License Key
How to Add a License Key to VMware ESXi:
1) While logging into vSphere Client, you get a message indicating that the VMware Evaluation ESXi license will expire. Click OK.

2) From the main vSphere Client window, switch to the Configuration tab.

3) Under Software, click on Licensed Features. Click Edit (upper right corner of screen) to change the ESX Server License Type.

4) Check Assign a new license key to this host and click Enter key.... button.

5) Enter your license key you obtained from VMware and click OK.

6) That's it!
Related Posts:
Part 1 The Time Has Come
Part 2 Running ESXi on VMware Fusion
Part 3 Building My ESXi Server
Part 4 Installing ESXi 4 on a USB Stick
Part 5 Installing vSphere Client on Windows
Part 6 Updating ESXi using vSphere Host Update Utility
Part 7 Browsing the VMware ESXi Datastore
Part 8 WinSCP to the Rescue
Part 9 Creating a VM
Part 10 Downloading a Virtual Machine
Part 11 Running vSphere Client from Ubuntu
Part 12 Running vSphere Client from Mac OS
Part 13 Adding/Removing a VM to ESXi
Part 14 Export in ESXi
Part 15 Deploying OVF Templates
Part 16 Adding a License Key
Monday, April 19, 2010
Disabling Windows 2003 Shutdown Tracker
I have always found the Windows 2003 Shutdown Tracker extremely annoying. Definitely I have no interest in using this in my home network.
How to Disable Windows 2003 Shutdown Tracker:
1) Click Start > Run.
2) In the Run box type "gpedit.msc"
3) You will need to expand some of the folders by clicking on the + sign. Go to Local Computer Policy > Computer Configuration > Administrative Templates > System

4) Double click Display Shutdown Event Tracker and select the Disabled checkbox and press OK

5) That's it!
How to Disable Windows 2003 Shutdown Tracker:
1) Click Start > Run.
2) In the Run box type "gpedit.msc"
3) You will need to expand some of the folders by clicking on the + sign. Go to Local Computer Policy > Computer Configuration > Administrative Templates > System
4) Double click Display Shutdown Event Tracker and select the Disabled checkbox and press OK
5) That's it!
Friday, April 16, 2010
My Own ESXi Server Part 15 Deploying OVF Templates
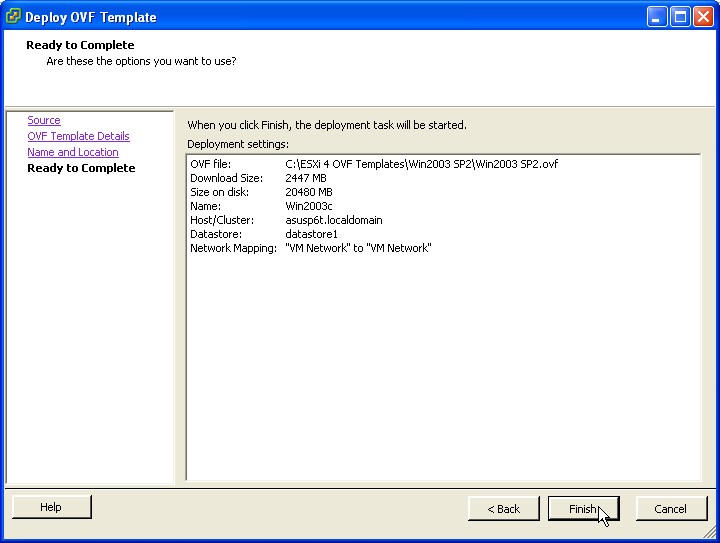
In Part 14, I covered how to Export an OVF Template from an existing virtual machine. Once you have created that template, you can now deploy as needed. Before an OVF file is imported, the vSPhere Client validates the file and ensures that it is compatible with that version of VMware ESXi.
How to Deploy an OVF Template
1) In the vSphere Client, select File > Deploy OVF Template.
2) Specify the location of the template file

3) Review the OVF Template Details page and click Next.

4) Specify a name for the Virtual Machine and click Next.

5) Click Finish.

6) That's it! It took about 20 minutes and then the new virtual machine will show up in vSphere Client list.
Related Posts:
Part 1 The Time Has Come
Part 2 Running ESXi on VMware Fusion
Part 3 Building My ESXi Server
Part 4 Installing ESXi 4 on a USB Stick
Part 5 Installing vSphere Client on Windows
Part 6 Updating ESXi using vSphere Host Update Utility
Part 7 Browsing the VMware ESXi Datastore
Part 8 WinSCP to the Rescue
Part 9 Creating a VM
Part 10 Downloading a Virtual Machine
Part 11 Running vSphere Client from Ubuntu
Part 12 Running vSphere Client from Mac OS
Part 13 Adding/Removing a VM to ESXi
Part 14 Export in ESXi
Part 15 Deploying OVF Templates
Part 16 Adding a License Key
How to Deploy an OVF Template
1) In the vSphere Client, select File > Deploy OVF Template.
2) Specify the location of the template file

3) Review the OVF Template Details page and click Next.

4) Specify a name for the Virtual Machine and click Next.

5) Click Finish.
6) That's it! It took about 20 minutes and then the new virtual machine will show up in vSphere Client list.
Related Posts:
Part 1 The Time Has Come
Part 2 Running ESXi on VMware Fusion
Part 3 Building My ESXi Server
Part 4 Installing ESXi 4 on a USB Stick
Part 5 Installing vSphere Client on Windows
Part 6 Updating ESXi using vSphere Host Update Utility
Part 7 Browsing the VMware ESXi Datastore
Part 8 WinSCP to the Rescue
Part 9 Creating a VM
Part 10 Downloading a Virtual Machine
Part 11 Running vSphere Client from Ubuntu
Part 12 Running vSphere Client from Mac OS
Part 13 Adding/Removing a VM to ESXi
Part 14 Export in ESXi
Part 15 Deploying OVF Templates
Part 16 Adding a License Key
Wednesday, April 14, 2010
My Own ESXi Server Part 14 Export in ESXi
One of the tremendous benefits of using VMware is the ability to provision virtual machines very quickly. To facilitate that process, there is Export functionality that allows you to preserve a virtual machine as a template to be used in the future. One example could be to preserve a base OS installation with all the latest patches installed.
The Export functionality preserves the templates in OVF format.
To Export an OVF Template:
1) Select the virtual machine and select File > Export > Export OVF Template.
2) Complete the Export OVF Template window.
a) You can specify whatever name you want for the template.
b) The directory specified will be a location available to the vSphere Client and not the datastore browser.
c) In the Optimized for field, determine how you want to store the files.
Select Web (OVF) to store the OVF template as a set of files (.ovf, .vmdk, and .mf) This format is
optimal if you plan to publish the OVF files on a web server or image library. The package can be
imported, for example, into the vSphere client by publishing the URL to the .ovf file.
Select Physical Media (OVA) to package the OVF template into a single .ova file. This might be
convenient to distribute the OVF package as a single file if it needs to be explicitly downloaded from
a web site or moved around using a USB key.
d) Select the checkbox for Create folder for OVF template.
e) Fill in any description that will be of value later.
Click OK

3) The Export process took about 20 minutes.
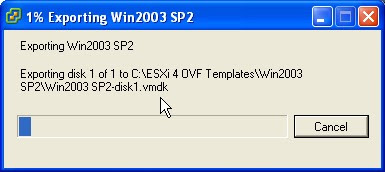
4) That's it! Once it is done, you should see a folder in the directory you specified with the template.
Related Posts:
Part 1 The Time Has Come
Part 2 Running ESXi on VMware Fusion
Part 3 Building My ESXi Server
Part 4 Installing ESXi 4 on a USB Stick
Part 5 Installing vSphere Client on Windows
Part 6 Updating ESXi using vSphere Host Update Utility
Part 7 Browsing the VMware ESXi Datastore
Part 8 WinSCP to the Rescue
Part 9 Creating a VM
Part 10 Downloading a Virtual Machine
Part 11 Running vSphere Client from Ubuntu
Part 12 Running vSphere Client from Mac OS
Part 13 Adding/Removing a VM to ESXi
Part 14 Export in ESXi
Part 15 Deploying OVF Templates
Part 16 Adding a License Key
Monday, April 12, 2010
Secrets - Hidden Settings for Mac
I wish I knew Secrets when I first started to use my Mac. For a geek like me, it provides a tremendous amount of tweaking options all in one place. It saves having to remember or look up infrequently used Mac configurable settings using Terminal.

Explore and I hope you find some useful tweak!

Explore and I hope you find some useful tweak!
Friday, April 9, 2010
Evernote
Evernote is probably the application I use most frequently. I use Evernote to capture and organize all kinds of data all in one spot. By far the majority of content is articles from the web I want to keep for later reference. One of the key features for me is the ability to access it from any computer I want. The data is kept both locally and in the cloud.
While tagging is available, I find it far more useful to organize by notebooks. As I add more and more content, I continue to add additional notebooks keeping each notebook a manageable size for me.
I have been using Evernote for over a year now, and have not needed to upgrade from the ad-supported free account.
Thursday, April 8, 2010
AppFresh
If you are like me and like to install lots of software on you Mac, then you certainly need AppFresh. AppFresh will help you keep all your applications, widgets, preference panes and application plugins up to date.

By default, the main screen will display all the software that has updates available. As you can see I have some software listed more than once e.g. Acorn. The scan was so complete that it even scanned my attached Drobo. As you select each item, you can see where the software is located at the bottom of the screen. For each selection you can also right-click, and Install. For the most part, this worked but not always.

By default, the main screen will display all the software that has updates available. As you can see I have some software listed more than once e.g. Acorn. The scan was so complete that it even scanned my attached Drobo. As you select each item, you can see where the software is located at the bottom of the screen. For each selection you can also right-click, and Install. For the most part, this worked but not always.
Wednesday, April 7, 2010
Diskutil command
diskutil is a Mac OS X command that provides information about, and allows the administration of, the partitioning scheme of disks, optical discs, and AppleRAID sets.
One example is run the command diskutil list in Terminal. The result is a list of all disks and all of their partitions are listed.

In the example above:
disk0 is the hard drive in my Mac Mini
disk1 is the attached Drobo
disk2 is the dvd.
Here are some other examples taken from the Man Pages:
Erase a disk
diskutil eraseDisk UFS UntitledUFS disk3
Erase a volume
diskutil eraseVolume HFS+ UntitledHFS /Volumes/SomeDisk
Partition a disk with three partitions
diskutil partitionDisk disk3 3 HFS+ Untitled 10G UFS UntitledUFS 10G MS-DOS DOS 10G
Partition a disk with the APM partitioning scheme
diskutil partitionDisk disk3 APM HFS+ vol1 25% Journaled HFS+ vol2 25% Journaled HFS+ vol3 50% Free Space volX 0%
Partition a disk with the GPT partitioning scheme
diskutil partitionDisk disk3 GPT HFS+ vol1 25% MS-DOS vol2 25% HFS+ vol3 50% Free Space volX 0%
Resize a volume and create a volume after it, using all remaining space
diskutil resizeVolume /Volumes/SomeDisk 50g MS-DOS DOS 0b
Resize a volume and leave all remaining space as unused
diskutil resizeVolume /Volumes/SomeDisk 12g
Merge two partitions into a new partition
diskutil mergePartitions JHFS+ not disk1s3 disk1s5
Split a partition into three new ones
diskutil splitPartition /Volumes/SomeDisk JHFS+ vol1 12g MS-DOS vol2 8g JHFS+ vol3 0b
Create a RAID
diskutil createRAID mirror MirroredVolume JHFS+ disk1 disk2
Destroy a RAID
diskutil destroyRAID /Volumes/MirroredVolume
Repair a damaged RAID
diskutil repairMirror /Volumes/MirroredVolume disk3
Convert volume into RAID volume
diskutil enableRAID mirror /Volumes/ExistingVolume
If seeing all these examples makes you nervous, then stick with the Disk Utility gui app!
Tuesday, April 6, 2010
Taking Screenshots with Preview
I have previously covered taking screenshots using keyboard shortcuts, from terminal, and Snagit for Mac. I recently found another way using Preview that I was not aware. Not only that, but you can also annotate.

With Preview open, you can take a screenshot by clicking on File > Take Screen Shot and then choosing one of From Selection, From Window or From Entire Screen. I took the above screenshot using the From Entire Screen option. Then using Preview, I cropped what I wanted to show. As I mentioned you can also annotate the image, and then save it in a file format of your choice.

With Preview open, you can take a screenshot by clicking on File > Take Screen Shot and then choosing one of From Selection, From Window or From Entire Screen. I took the above screenshot using the From Entire Screen option. Then using Preview, I cropped what I wanted to show. As I mentioned you can also annotate the image, and then save it in a file format of your choice.
Monday, April 5, 2010
Exposé Active Screen Corners
If you are not already using Exposé Active Screen Corners, you should. This is my setup:

When I move the mouse to,
the top right corner, all the windows are displayed as thumbnails and I can quickly select the window I want to work in.
the top left corner, all windows move away and I can see just the desktop.
the bottom right corner, I see the only the windows for the currently application being worked on.
the bottom left corner, all the spaces are shown.
If you don't like my setup, you can also specify Dashboard, Start Screen Saver, Disable Screen Saver, and Put Display to Sleep.
Thursday, April 1, 2010
Fixing a Logitech MX Revolution Mouse that won't Charge
This week my Logitech MX Revolution mouse stopped charging. When placed in the cradle it would flash green for a few seconds indicating it was charging, but then red for a few seconds. After doing a little research, I decided to clean the contacts. First I scraped them and then cleaned with rubbing alcohol. This seemed to helped, but placing the mouse on and off the cradle a couple of times, the red flashing started again.
Back to the drawing board! I saw a post where someone SLAMMED their mouse and it worked. Hmm....strangely enough other users indicated they had similar luck! Well, what did I have to lose?
Believe it or not, it WORKED for me! Not only that, but it was extremely therapeutic! My guess is that SLAMMING the mouse likely shifted the battery inside allowing for better contacts.
Wednesday, March 31, 2010
My Own ESXi Server Part 13 Adding/Removing a VM to ESXi
In my previous posts, I showed how to create a new VM (Part 9 Creating a VM) and how to download a VM (Part 10 Downloading a Virtual Machine). Before long, you will accumulate many VMs and may not need them all.
How to Remove a Virtual Machine from Inventory List
1) Using the vSphere Client, select the VM. Right-click and choose either Remove from Inventory or Delete from Disk. Remove from Inventory will remove the virtual machine from the inventory list but leave the underlying directory of files in the datastore. On the other hand, Delete from Disk will remove from inventory as well as delete the directory from the datastore.
Removing a Virtual Machine is obvious, but adding one is not!
How to Add a Virtual Machine to Inventory List
1) Using the vSphere Client, switch to the Summary tab.

2) Select the appropriate datastore. Right-click and select Browse Datastore.

3) The Datastore Browser will open up. Navigate to the virtual machine directory you want to add.

4) Select the .vmx file. Right-click and select Add to Inventory.

5) Enter a name for this virtual machine. Click Next.

6) Select resource pool and click Next.

7) Click Finish.

8) Close Datastore Browser.
9) You should now see your VM added to the Inventory List.

Related Posts:
Part 1 The Time Has Come
Part 2 Running ESXi on VMware Fusion
Part 3 Building My ESXi Server
Part 4 Installing ESXi 4 on a USB Stick
Part 5 Installing vSphere Client on Windows
Part 6 Updating ESXi using vSphere Host Update Utility
Part 7 Browsing the VMware ESXi Datastore
Part 8 WinSCP to the Rescue
Part 9 Creating a VM
Part 10 Downloading a Virtual Machine
Part 11 Running vSphere Client from Ubuntu
Part 12 Running vSphere Client from Mac OS
Part 13 Adding/Removing a VM to ESXi
Part 14 Export in ESXi
Part 15 Deploying OVF Templates
Part 16 Adding a License Key
Subscribe to:
Comments (Atom)


