At some point, you will run into a situation where one of your disks is running a bit low on space, and you want to increase to accommodate future growth.
How to Increase Size of Disk:
1) Using VMware Sphere Client, right-click on the virtual machine you want to increase the disk size and click Edit Settings.
2) Select Hard Disk. Adjust the size of the disk and click OK.
3) That's it from the VMware perspective! The next step is for the guest operating system to reflect the change in disk size. To do so, you will need some partitioning software that supports your operating system. To continue with this example, we will increase the partition size of a Windows 2003 system using the open source software GParted.
As I already had a burned copy of GParted, I will need to boot from the CD. To get the virtual machine to boot from the CD, I need to make one change to the bios. Still in the Edit Settings, switch to the Options tab. Select Boot Options, and check Force BIOS Setup and click OK.
4) When the virtual machine is booted next, change the boot option to ensure it boots from the CD.
5) If bios change was done correctly, you should boot off the CD into GParted. Right-click on dev/sda1 ntfs partition, and choose Resize/Move.
6) Increase the partition until it takes there is no free space. Click Resize.
7) Your partition should now show the increased size.
8) Nothing has been done yet. All you have done is enter the new proposed configuration. Click Apply.
9) Click Close once complete.
10) You should now see the update partition configuration.
11) Be sure to remove your Gparted or other CD/DVD before you reboot your system.
12) That's it!
Showing posts with label VMware. Show all posts
Friday, April 23, 2010
Wednesday, April 21, 2010
My Own ESXi Server Part 16 Adding a License Key
How to Add a License Key to VMware ESXi:
1) While logging into vSphere Client, you get a message indicating that the VMware Evaluation ESXi license will expire. Click OK.
2) From the main vSphere Client window, switch to the Configuration tab.
3) Under Software, click on Licensed Features. Click Edit (upper right corner of screen) to change the ESX Server License Type.
4) Check Assign a new license key to this host and click Enter key.... button.
5) Enter your license key you obtained from VMware and click OK.
6) That's it!
Related Posts:
Part 1 The Time Has Come
Part 2 Running ESXi on VMware Fusion
Part 3 Building My ESXi Server
Part 4 Installing ESXi 4 on a USB Stick
Part 5 Installing vSphere Client on Windows
Part 6 Updating ESXi using vSphere Host Update Utility
Part 7 Browsing the VMware ESXi Datastore
Part 8 WinSCP to the Rescue
Part 9 Creating a VM
Part 10 Downloading a Virtual Machine
Part 11 Running vSphere Client from Ubuntu
Part 12 Running vSphere Client from Mac OS
Part 13 Adding/Removing a VM to ESXi
Part 14 Export in ESXi
Part 15 Deploying OVF Templates
Part 16 Adding a License Key
1) While logging into vSphere Client, you get a message indicating that the VMware Evaluation ESXi license will expire. Click OK.
2) From the main vSphere Client window, switch to the Configuration tab.
3) Under Software, click on Licensed Features. Click Edit (upper right corner of screen) to change the ESX Server License Type.
4) Check Assign a new license key to this host and click Enter key.... button.
5) Enter your license key you obtained from VMware and click OK.
6) That's it!
Related Posts:
Part 1 The Time Has Come
Part 2 Running ESXi on VMware Fusion
Part 3 Building My ESXi Server
Part 4 Installing ESXi 4 on a USB Stick
Part 5 Installing vSphere Client on Windows
Part 6 Updating ESXi using vSphere Host Update Utility
Part 7 Browsing the VMware ESXi Datastore
Part 8 WinSCP to the Rescue
Part 9 Creating a VM
Part 10 Downloading a Virtual Machine
Part 11 Running vSphere Client from Ubuntu
Part 12 Running vSphere Client from Mac OS
Part 13 Adding/Removing a VM to ESXi
Part 14 Export in ESXi
Part 15 Deploying OVF Templates
Part 16 Adding a License Key
Friday, April 16, 2010
My Own ESXi Server Part 15 Deploying OVF Templates
In Part 14, I covered how to Export an OVF Template from an existing virtual machine. Once you have created that template, you can now deploy as needed. Before an OVF file is imported, the vSPhere Client validates the file and ensures that it is compatible with that version of VMware ESXi.
How to Deploy an OVF Template
1) In the vSphere Client, select File > Deploy OVF Template.
2) Specify the location of the template file
3) Review the OVF Template Details page and click Next.
4) Specify a name for the Virtual Machine and click Next.
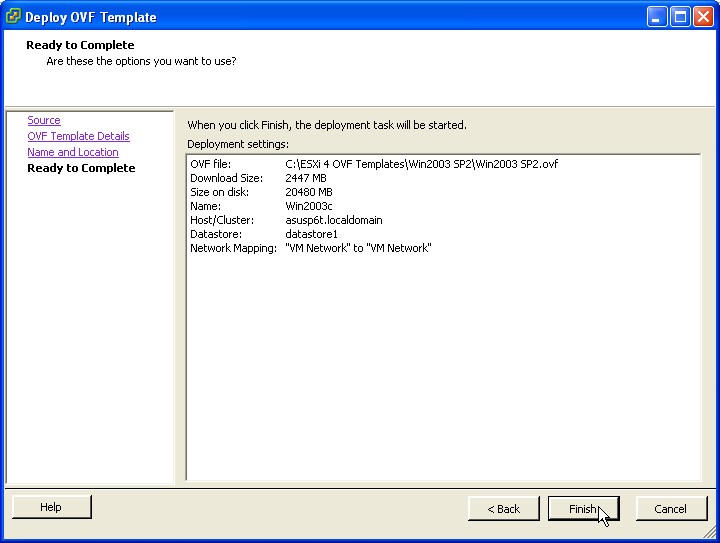
5) Click Finish.
6) That's it! It took about 20 minutes and then the new virtual machine will show up in vSphere Client list.
Related Posts:
Part 1 The Time Has Come
Part 2 Running ESXi on VMware Fusion
Part 3 Building My ESXi Server
Part 4 Installing ESXi 4 on a USB Stick
Part 5 Installing vSphere Client on Windows
Part 6 Updating ESXi using vSphere Host Update Utility
Part 7 Browsing the VMware ESXi Datastore
Part 8 WinSCP to the Rescue
Part 9 Creating a VM
Part 10 Downloading a Virtual Machine
Part 11 Running vSphere Client from Ubuntu
Part 12 Running vSphere Client from Mac OS
Part 13 Adding/Removing a VM to ESXi
Part 14 Export in ESXi
Part 15 Deploying OVF Templates
Part 16 Adding a License Key
How to Deploy an OVF Template
1) In the vSphere Client, select File > Deploy OVF Template.
2) Specify the location of the template file
3) Review the OVF Template Details page and click Next.
4) Specify a name for the Virtual Machine and click Next.
5) Click Finish.
6) That's it! It took about 20 minutes and then the new virtual machine will show up in vSphere Client list.
Related Posts:
Part 1 The Time Has Come
Part 2 Running ESXi on VMware Fusion
Part 3 Building My ESXi Server
Part 4 Installing ESXi 4 on a USB Stick
Part 5 Installing vSphere Client on Windows
Part 6 Updating ESXi using vSphere Host Update Utility
Part 7 Browsing the VMware ESXi Datastore
Part 8 WinSCP to the Rescue
Part 9 Creating a VM
Part 10 Downloading a Virtual Machine
Part 11 Running vSphere Client from Ubuntu
Part 12 Running vSphere Client from Mac OS
Part 13 Adding/Removing a VM to ESXi
Part 14 Export in ESXi
Part 15 Deploying OVF Templates
Part 16 Adding a License Key
Wednesday, April 14, 2010
My Own ESXi Server Part 14 Export in ESXi
One of the tremendous benefits of using VMware is the ability to provision virtual machines very quickly. To facilitate that process, there is Export functionality that allows you to preserve a virtual machine as a template to be used in the future. One example could be to preserve a base OS installation with all the latest patches installed.
The Export functionality preserves the templates in OVF format.
To Export an OVF Template:
1) Select the virtual machine and select File > Export > Export OVF Template.
2) Complete the Export OVF Template window.
a) You can specify whatever name you want for the template.
b) The directory specified will be a location available to the vSphere Client and not the datastore browser.
c) In the Optimized for field, determine how you want to store the files.
Select Web (OVF) to store the OVF template as a set of files (.ovf, .vmdk, and .mf) This format is
optimal if you plan to publish the OVF files on a web server or image library. The package can be
imported, for example, into the vSphere client by publishing the URL to the .ovf file.
Select Physical Media (OVA) to package the OVF template into a single .ova file. This might be
convenient to distribute the OVF package as a single file if it needs to be explicitly downloaded from
a web site or moved around using a USB key.
d) Select the checkbox for Create folder for OVF template.
e) Fill in any description that will be of value later.
Click OK
3) The Export process took about 20 minutes.
4) That's it! Once it is done, you should see a folder in the directory you specified with the template.
Related Posts:
Part 1 The Time Has Come
Part 2 Running ESXi on VMware Fusion
Part 3 Building My ESXi Server
Part 4 Installing ESXi 4 on a USB Stick
Part 5 Installing vSphere Client on Windows
Part 6 Updating ESXi using vSphere Host Update Utility
Part 7 Browsing the VMware ESXi Datastore
Part 8 WinSCP to the Rescue
Part 9 Creating a VM
Part 10 Downloading a Virtual Machine
Part 11 Running vSphere Client from Ubuntu
Part 12 Running vSphere Client from Mac OS
Part 13 Adding/Removing a VM to ESXi
Part 14 Export in ESXi
Part 15 Deploying OVF Templates
Part 16 Adding a License Key
The Export functionality preserves the templates in OVF format.
To Export an OVF Template:
1) Select the virtual machine and select File > Export > Export OVF Template.
2) Complete the Export OVF Template window.
a) You can specify whatever name you want for the template.
b) The directory specified will be a location available to the vSphere Client and not the datastore browser.
c) In the Optimized for field, determine how you want to store the files.
Select Web (OVF) to store the OVF template as a set of files (.ovf, .vmdk, and .mf) This format is
optimal if you plan to publish the OVF files on a web server or image library. The package can be
imported, for example, into the vSphere client by publishing the URL to the .ovf file.
Select Physical Media (OVA) to package the OVF template into a single .ova file. This might be
convenient to distribute the OVF package as a single file if it needs to be explicitly downloaded from
a web site or moved around using a USB key.
d) Select the checkbox for Create folder for OVF template.
e) Fill in any description that will be of value later.
Click OK
3) The Export process took about 20 minutes.
4) That's it! Once it is done, you should see a folder in the directory you specified with the template.
Related Posts:
Part 1 The Time Has Come
Part 2 Running ESXi on VMware Fusion
Part 3 Building My ESXi Server
Part 4 Installing ESXi 4 on a USB Stick
Part 5 Installing vSphere Client on Windows
Part 6 Updating ESXi using vSphere Host Update Utility
Part 7 Browsing the VMware ESXi Datastore
Part 8 WinSCP to the Rescue
Part 9 Creating a VM
Part 10 Downloading a Virtual Machine
Part 11 Running vSphere Client from Ubuntu
Part 12 Running vSphere Client from Mac OS
Part 13 Adding/Removing a VM to ESXi
Part 14 Export in ESXi
Part 15 Deploying OVF Templates
Part 16 Adding a License Key
Wednesday, March 31, 2010
My Own ESXi Server Part 13 Adding/Removing a VM to ESXi
In my previous posts, I showed how to create a new VM (Part 9 Creating a VM) and how to download a VM (Part 10 Downloading a Virtual Machine). Before long, you will accumulate many VMs and may not need them all.
How to Remove a Virtual Machine from Inventory List
1) Using the vSphere Client, select the VM. Right-click and choose either Remove from Inventory or Delete from Disk. Remove from Inventory will remove the virtual machine from the inventory list but leave the underlying directory of files in the datastore. On the other hand, Delete from Disk will remove from inventory as well as delete the directory from the datastore.
Removing a Virtual Machine is obvious, but adding one is not!
How to Add a Virtual Machine to Inventory List
1) Using the vSphere Client, switch to the Summary tab.
2) Select the appropriate datastore. Right-click and select Browse Datastore.
3) The Datastore Browser will open up. Navigate to the virtual machine directory you want to add.
4) Select the .vmx file. Right-click and select Add to Inventory.
5) Enter a name for this virtual machine. Click Next.
6) Select resource pool and click Next.
7) Click Finish.
8) Close Datastore Browser.
9) You should now see your VM added to the Inventory List.
Related Posts:
Part 1 The Time Has Come
Part 2 Running ESXi on VMware Fusion
Part 3 Building My ESXi Server
Part 4 Installing ESXi 4 on a USB Stick
Part 5 Installing vSphere Client on Windows
Part 6 Updating ESXi using vSphere Host Update Utility
Part 7 Browsing the VMware ESXi Datastore
Part 8 WinSCP to the Rescue
Part 9 Creating a VM
Part 10 Downloading a Virtual Machine
Part 11 Running vSphere Client from Ubuntu
Part 12 Running vSphere Client from Mac OS
Part 13 Adding/Removing a VM to ESXi
Part 14 Export in ESXi
Part 15 Deploying OVF Templates
Part 16 Adding a License Key
How to Remove a Virtual Machine from Inventory List
1) Using the vSphere Client, select the VM. Right-click and choose either Remove from Inventory or Delete from Disk. Remove from Inventory will remove the virtual machine from the inventory list but leave the underlying directory of files in the datastore. On the other hand, Delete from Disk will remove from inventory as well as delete the directory from the datastore.
Removing a Virtual Machine is obvious, but adding one is not!
How to Add a Virtual Machine to Inventory List
1) Using the vSphere Client, switch to the Summary tab.
2) Select the appropriate datastore. Right-click and select Browse Datastore.
3) The Datastore Browser will open up. Navigate to the virtual machine directory you want to add.
4) Select the .vmx file. Right-click and select Add to Inventory.
5) Enter a name for this virtual machine. Click Next.
6) Select resource pool and click Next.
7) Click Finish.
8) Close Datastore Browser.
9) You should now see your VM added to the Inventory List.
Related Posts:
Part 1 The Time Has Come
Part 2 Running ESXi on VMware Fusion
Part 3 Building My ESXi Server
Part 4 Installing ESXi 4 on a USB Stick
Part 5 Installing vSphere Client on Windows
Part 6 Updating ESXi using vSphere Host Update Utility
Part 7 Browsing the VMware ESXi Datastore
Part 8 WinSCP to the Rescue
Part 9 Creating a VM
Part 10 Downloading a Virtual Machine
Part 11 Running vSphere Client from Ubuntu
Part 12 Running vSphere Client from Mac OS
Part 13 Adding/Removing a VM to ESXi
Part 14 Export in ESXi
Part 15 Deploying OVF Templates
Part 16 Adding a License Key
Tuesday, March 30, 2010
My Own ESXi Server Part 12 Running vSphere Client from Mac OS
VMware provides a vSphere Client for Windows only. I showed in my last post that you can access a vSphere Client running on Windows from Ubuntu and make it appear to run as just another application. So what about Mac OS X? It turns out that since Remote Desktop Connection for Mac is available, we can do exactly the same as Ubuntu. See my previous post My Own ESXi Server Part 11 Running vSphere Client from Ubuntu.
As with the Linux setup, remote desktop must be set up on the Windows system. See my post Remote Desktop Part 2 - Getting Back to Windows on how to configure. I ran into one big problem in that even though I can remote desktop back into Windows XP, I could not get it to run just one application. After all my futile efforts, I switched to using Windows 2003 Server and this worked like a charm.
How to Run vSphere Client from Mac OS
1) Start the Remote Desktop Connection for Mac app.
2) Enter the ip address or the name of the server. Do NOT click Connect yet!
3) Go to the top menu and select RDC > Preferences
6) Close the Preferences window.
7) Using the top menu , select File > Save As...
8) Enter name and click Save.
9) From now on, when you start you select File > Open a Saved Connection.. or File > Open a Recent Connection. Select the appropriate RDP connection.
10) Enter Password and click OK.
11) Click Connect.
12) Enter User name and Password for the ESXi Server, and click Login.
13) You have now successfully gained access to vSphere Client! When you are done, exit by closing the vSphere Client window.
Related Posts:
Part 1 The Time Has Come
Part 2 Running ESXi on VMware Fusion
Part 3 Building My ESXi Server
Part 4 Installing ESXi 4 on a USB Stick
Part 5 Installing vSphere Client on Windows
Part 6 Updating ESXi using vSphere Host Update Utility
Part 7 Browsing the VMware ESXi Datastore
Part 8 WinSCP to the Rescue
Part 9 Creating a VM
Part 10 Downloading a Virtual Machine
Part 11 Running vSphere Client from Ubuntu
Part 12 Running vSphere Client from Mac OS
Part 13 Adding/Removing a VM to ESXi
Part 14 Export in ESXi
Part 15 Deploying OVF Templates
Part 16 Adding a License Key
As with the Linux setup, remote desktop must be set up on the Windows system. See my post Remote Desktop Part 2 - Getting Back to Windows on how to configure. I ran into one big problem in that even though I can remote desktop back into Windows XP, I could not get it to run just one application. After all my futile efforts, I switched to using Windows 2003 Server and this worked like a charm.
How to Run vSphere Client from Mac OS
1) Start the Remote Desktop Connection for Mac app.
2) Enter the ip address or the name of the server. Do NOT click Connect yet!
3) Go to the top menu and select RDC > Preferences
4) On the Login tab, fill in User name and domain fields.
5) On the Applications tab, check Start only the following Windows-based application.Add the Application path and file name for vSphere Client on the Windows 2003 server. I added C:\Program Files\VMware\Infrastructure\Virtual Infrastructure Client\Launcher\VpxClient.exe
For Working directory,
C:\Program Files\VMware\Infrastructure\Virtual Infrastructure Client\Launcher\
6) Close the Preferences window.
7) Using the top menu , select File > Save As...
8) Enter name and click Save.
9) From now on, when you start you select File > Open a Saved Connection.. or File > Open a Recent Connection. Select the appropriate RDP connection.
10) Enter Password and click OK.
11) Click Connect.
12) Enter User name and Password for the ESXi Server, and click Login.
13) You have now successfully gained access to vSphere Client! When you are done, exit by closing the vSphere Client window.
Related Posts:
Part 1 The Time Has Come
Part 2 Running ESXi on VMware Fusion
Part 3 Building My ESXi Server
Part 4 Installing ESXi 4 on a USB Stick
Part 5 Installing vSphere Client on Windows
Part 6 Updating ESXi using vSphere Host Update Utility
Part 7 Browsing the VMware ESXi Datastore
Part 8 WinSCP to the Rescue
Part 9 Creating a VM
Part 10 Downloading a Virtual Machine
Part 11 Running vSphere Client from Ubuntu
Part 12 Running vSphere Client from Mac OS
Part 13 Adding/Removing a VM to ESXi
Part 14 Export in ESXi
Part 15 Deploying OVF Templates
Part 16 Adding a License Key
Monday, March 29, 2010
My Own ESXi Server Part 11 Running vSphere Client from Ubuntu
VMware provides vSphere Client for Windows only. So what do you do if you run a Linux desktop? The answer is to remote desktop into a Windows box that has a vSphere Client on it. To make it as seamless as possible I will configure Terminal Server Client to run a single application.
In order for this setup to work, remote desktop must be set up on the Windows system. See my post Remote Desktop Part 2 - Getting Back to Windows on how to configure. I ran into one big problem in that even though I can remote desktop back into Windows XP, I could not get it to run just one application. After all my futile efforts, I switched to using Windows 2003 Server and this worked like a charm.
How to Run vSphere Client From Ubuntu
1) Start the Terminal Server Client by going to Applications > Internet > Terminal Server Client.
2) Enter the ip address or the name of the server. Set the Protocol to RDP. Enter a User Name and Password that has access to remote desktop into the Windows 2003 server. Switch to the Programs tab.
3) Check Start only the following on connection.
Click Save As.
4) Enter the name and click OK.
5) Now that you have saved the connection information which can be used in the future. Click Connect.
6) Enter User name and Password for the ESXi Server, and press Enter.
7) You have now successfully gained access to vSphere Client! When you are done, exit by closing the vSphere Client window.
Related Posts:
Part 1 The Time Has Come
Part 2 Running ESXi on VMware Fusion
Part 3 Building My ESXi Server
Part 4 Installing ESXi 4 on a USB Stick
Part 5 Installing vSphere Client on Windows
Part 6 Updating ESXi using vSphere Host Update Utility
Part 7 Browsing the VMware ESXi Datastore
Part 8 WinSCP to the Rescue
Part 9 Creating a VM
Part 10 Downloading a Virtual Machine
Part 11 Running vSphere Client from Ubuntu
Part 12 Running vSphere Client from Mac OS
Part 13 Adding/Removing a VM to ESXi
Part 14 Export in ESXi
Part 15 Deploying OVF Templates
Part 16 Adding a License Key
In order for this setup to work, remote desktop must be set up on the Windows system. See my post Remote Desktop Part 2 - Getting Back to Windows on how to configure. I ran into one big problem in that even though I can remote desktop back into Windows XP, I could not get it to run just one application. After all my futile efforts, I switched to using Windows 2003 Server and this worked like a charm.
How to Run vSphere Client From Ubuntu
1) Start the Terminal Server Client by going to Applications > Internet > Terminal Server Client.
2) Enter the ip address or the name of the server. Set the Protocol to RDP. Enter a User Name and Password that has access to remote desktop into the Windows 2003 server. Switch to the Programs tab.
3) Check Start only the following on connection.
In the Program path and filename, add the Application path and file name for vSphere Client on the Windows 2003 server. I added C:\Program Files\VMware\Infrastructure\Virtual Infrastructure Client\Launcher\VpxClient.exe
In the Start in the following folder, add the working directory. I added
C:\Program Files\VMware\Infrastructure\Virtual Infrastructure Client\Launcher\
4) Enter the name and click OK.
5) Now that you have saved the connection information which can be used in the future. Click Connect.
6) Enter User name and Password for the ESXi Server, and press Enter.
7) You have now successfully gained access to vSphere Client! When you are done, exit by closing the vSphere Client window.
Related Posts:
Part 1 The Time Has Come
Part 2 Running ESXi on VMware Fusion
Part 3 Building My ESXi Server
Part 4 Installing ESXi 4 on a USB Stick
Part 5 Installing vSphere Client on Windows
Part 6 Updating ESXi using vSphere Host Update Utility
Part 7 Browsing the VMware ESXi Datastore
Part 8 WinSCP to the Rescue
Part 9 Creating a VM
Part 10 Downloading a Virtual Machine
Part 11 Running vSphere Client from Ubuntu
Part 12 Running vSphere Client from Mac OS
Part 13 Adding/Removing a VM to ESXi
Part 14 Export in ESXi
Part 15 Deploying OVF Templates
Part 16 Adding a License Key
Friday, March 26, 2010
My Own ESXi Server Part 10 Downloading a Virtual Machine
In my previous post, I created a new virtual machine from an ISO just the same as if you had installed from a CD. With virtual machines, you also have the option of creating a virtual machine from a the VA Marketplace. At the VA Marketplace you will find pre-configured VMs ready for your deployment. In this post, I will deploy a small VM called Nostalgia from the VA Marketplace.
How to Deploy a Virtual Applicance from the VA Marketplace
1) From the main vSphere Client window, select File > Browse VA Marketplace.
2) Scroll the list of Virtual Appliances until you find one called Nostalgia.
3) Select Nostalgia, and click Next.
4) Click Next.
5) Change the name of the VM if you wish, Click Next.
6) Click Finish.
7) Hopefully the deployment completed successfully. Click Close.
8) Your new Nostalgia virtual machine should now be in the inventory list.
9) You can now start your VM. Please note that you may need to read up on your VM especially for the userid and password.
I have decided to continue the series with at least the following:
Part 11 Running vSphere Client from UbuntuPart 12 Running vSphere Client from Mac OS
Part 13 Adding/Removing a VM to ESXi
Part 14 Export in ESXi
Part 15 Deploying OVF Templates
Part 16 Adding a License Key
Related Posts:
Part 1 The Time Has Come
Part 2 Running ESXi on VMware Fusion
Part 3 Building My ESXi Server
Part 4 Installing ESXi 4 on a USB Stick
Part 5 Installing vSphere Client on Windows
Part 6 Updating ESXi using vSphere Host Update Utility
Part 7 Browsing the VMware ESXi Datastore
Part 8 WinSCP to the Rescue
Part 9 Creating a VM
Part 10 Downloading a Virtual Machine
Thursday, March 25, 2010
My Own ESXi Server Part 9 Creating a VM
Having following the previous 7 parts of My Own ESXi Server, you are now ready to create your first virtual machine (VM).
How to Create a Virtual Machine
1) From the main window of vSphere Client, click Create a new virtual machine.
2) On the Configuration, click Next.
3) Change the name of VM as you see fit and click Next.
4) If you have multiple datastores to choose, select one and click Next.
5) Select Guest Operating System and then Version, and click Next.
6) Adjust the Virtual disk size and click Next.
7) Check Edit the virtual machine settings before completion and click Continue.
8) Select New CD/DVD.
9) Check Connect at power on. Check Datastore ISO File and click Browse.
10) Browse datastore to location of the already uploaded iso and click OK.
11) Click Finish.

13) If you completed the OS installation, you should now have you first VM ready to use!
Related Posts:
Part 1 The Time Has Come
Part 2 Running ESXi on VMware Fusion
Part 3 Building My ESXi Server
Part 4 Installing ESXi 4 on a USB Stick
Part 5 Installing vSphere Client on Windows
Part 6 Updating ESXi using vSphere Host Update Utility
Part 7 Browsing the VMware ESXi Datastore
Part 8 WinSCP to the Rescue
Part 9 Creating a VM
Part 10 Downloading a Virtual Machine
***Updated March 26th 2010
I have decided to continue the series with at least the following:
Part 11 Running vSphere Client from Ubuntu
Part 12 Running vSphere Client from Mac OS
Part 13 Adding/Removing a VM to ESXi
Part 14 Export in ESXi
Part 15 Deploying OVF Templates
Part 16 Adding a License Key
How to Create a Virtual Machine
1) From the main window of vSphere Client, click Create a new virtual machine.
2) On the Configuration, click Next.
3) Change the name of VM as you see fit and click Next.
4) If you have multiple datastores to choose, select one and click Next.
5) Select Guest Operating System and then Version, and click Next.
6) Adjust the Virtual disk size and click Next.
7) Check Edit the virtual machine settings before completion and click Continue.
8) Select New CD/DVD.
9) Check Connect at power on. Check Datastore ISO File and click Browse.
10) Browse datastore to location of the already uploaded iso and click OK.
11) Click Finish.
12) You should now see your VM listed in the inventory. Please note that you still have to install the operating system. Start the VM by selecting it and right-click and select Power > Power On. You will need to look at the Console to see the actual screen.

13) If you completed the OS installation, you should now have you first VM ready to use!
Related Posts:
Part 1 The Time Has Come
Part 2 Running ESXi on VMware Fusion
Part 3 Building My ESXi Server
Part 4 Installing ESXi 4 on a USB Stick
Part 5 Installing vSphere Client on Windows
Part 6 Updating ESXi using vSphere Host Update Utility
Part 7 Browsing the VMware ESXi Datastore
Part 8 WinSCP to the Rescue
Part 9 Creating a VM
Part 10 Downloading a Virtual Machine
***Updated March 26th 2010
I have decided to continue the series with at least the following:
Part 11 Running vSphere Client from Ubuntu
Part 12 Running vSphere Client from Mac OS
Part 13 Adding/Removing a VM to ESXi
Part 14 Export in ESXi
Part 15 Deploying OVF Templates
Part 16 Adding a License Key
Subscribe to:
Posts (Atom)