In my previous post Let Your Mac Speak To You, I covered how you can get your Mac to convert text to speech. For Windows users, you can also do the same with ClipSpeak.
1) Using a browser, go to http://clipspeak.codeplex.com.
2) Download the latest version of ClipSpeak.
3) Expand the zip file and start ClipSpeak.
4) All you need to do is select some text (e.g. from a web page) and copy (Control-C). It will automatically start speaking.
Friday, February 26, 2010
Thursday, February 25, 2010
Let Your Mac Speak To You
I have always known that you can get your Mac to read to you. I have even played with it, but I have never used it on a regular basis. I will cover how to enable the Text to Speech feature. Hopefully this will kickstart me into using this feature more often. My plan is to start by having my Mac read web articles to me.
Turn on Text to Speech Feature
1) Choose Apple menu > System Preferences.
2) Click the Speech icon.
3) Switch to Text to Speech tab.
4) Check the Speak selected text when the key is pressed option, and then click Set Key. You should use one or more modifier keys (Command, Shift, Option, or Control) plus another key. Then click OK.

5) Now you can highlight any text in your browser of choice or any other application, and press the key combination you chose in the previous step to hear the text spoken.
Wednesday, February 24, 2010
A Smarter Related Posts Widget for Blogger
I have searched and tried out a few different techniques and widgets to provide Related Posts functionality. For my Culinary Aspiration blog, using the LinkWithin widget is perfect as it provides thumbnails to enhance the blog. For this blog, I don't need thumbnails! I did try using LinkWithin and it works ok, but I wanted to avoid pulling data from yet another source. I finally found what I was looking for. The post jQuery + GData API = A Smarter Related Posts widget for Blogger on More Tech Tips does a great job explain how to incorporate into your blog.
To add this Related Posts widget,
1) Go to Blogger > Layout > Page Elements
2) Click on Add a Gadget.
3) Select the category Basics, and then click the + sign next to HTML/JavaScript.
4) Leave the Title blank. I copied and pasted the code into the Content box and then click SAVE.

5) Drag the newly added gadget under Blog Posts.
6) Click SAVE to save your page elements layout.
7) That's it! You can now check out your blog.

Tuesday, February 23, 2010
How to Print a Contact List in Mac OS X
How to Print a Contact List in Mac OS X
1) Open Address Book.
2) Select the ALL group or selected contacts
3) File > Print
4) Click the down arrow button to the right of the printer
 5) In the Style dropdown, select Lists. You can also click on which attributes you want displayed.

6) Click Print
1) Open Address Book.
2) Select the ALL group or selected contacts
3) File > Print
4) Click the down arrow button to the right of the printer


6) Click Print
Monday, February 22, 2010
How to Print All or Part of your Mac Address Book
How to Print All or Part of your Mac Address Book
1) Open Address Book.
2) Select either ALL or selected contacts
3) File > Print
4) Click the down arrow button to the right of the printer

5) In the Style dropdown, you can now pick Pocket Address Book. You can also click on which attributes you want displayed.

6) Click Print.
1) Open Address Book.
2) Select either ALL or selected contacts
3) File > Print
4) Click the down arrow button to the right of the printer

5) In the Style dropdown, you can now pick Pocket Address Book. You can also click on which attributes you want displayed.

6) Click Print.
Friday, February 19, 2010
How to Get Rid of the Printer Icon in the Dock After Printing
Have you ever noticed that the printer icon stays in your dock after your printing is coming? I do, and I wanted it to disappear once I am finished printing my documents or photos.
Here are two ways to do so:
Next Time You Print
1) Next time you print and you see the printer icon in the dock, right-click (or Control-click) the printer icon, and select Auto Quit if there isn't already a checkmark next to it.
2) Right-click (or Control-click) and select Quit.
3) You are all set for the next time you print!
Make the Change Now!
1) Select the Apple Menu > System Preferences
2) Double-click the Print & Fax icon.
3) Double-click the printer you want to configure. In my example, I only have one printer.

4) You should now see the printer icon in the dock.
5) Right-click (or Control-click) the printer icon, and select Auto Quit if there isn't already a checkmark next to it.
6) Right-click (or Control-click) and select Quit.
7) You are all set for the next time you print!
Thursday, February 18, 2010
Remote Desktop - Part 6 Remote Desktop Web Connection for Windows
I previously covered how to remote desktop back into Windows in my post Remote Desktop - Part 2 Getting Back to Windows. Now I want to show you how to connect using Windows Remote Desktop Web Connection.
The basic steps are:
1) Install Remote Desktop Web Connection
2) Configure Internet Information Services (IIS)
3) Enable Remote Desktop
4) Configure Windows XP firewall
5) Connect to an Enabled Remote Desktop Web Connection
Step 1. Install Remote Desktop Web Connection
1) Go to Control Panel and open Add or Remove Programs.
2) Click Add/Remove Windows Components.

3) Select Internet Information Services, and then click Details.

4) Select World Wide Web Service, and then click Details.

5) Select Remote Desktop Web Connection, and then click OK.

6) Click OK to close Subcomponents of Internet Information Services (IIS) window.
7) Click Next in the Windows Components Wizard window

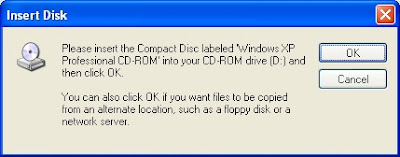
8) The install starts and shortly after you may be prompted for the XP CD. Click OK and either insert the cd or point to where the files can be found to allow the install to complete.

 9) Click Finish.

Step 2. Configure Internet Information Services (IIS)
1) Go to Control Panel > Administrative Tools > Internet Information Services. Note depending on your view, the path may be Control Panel > Performance and Maintenance > Administrative Tools > Internet Information
2) Expand your local computer, expand Web Sites, expand Default Web Site. You should now see a folder called tsweb.

3) Right-click the tsweb folder and then click Properties.

4) Click the Directory Security tab. Click the Edit button in Anonymous access and authentication control.

5) Check the Anonymous access check box on the Authentication Methods dialog box, and then click OK.

6) Click OK to close the tsweb Properties window.
7) Right-click the Default Web Site and then click Properties. As port 80 is a highly-used port and may be used by other software installed on your computer, I recommend changed it to some value between 1000 to 65535. I chose 1234. Change the TCP Port and click OK.

9) If your Default Web Site is Stopped, right-click and then click Start.
Step 3. Enable Remote Desktop
To Enable Remote Desktop to a Windows XP Professional system,
1) Click Start.
2) Right-click My Computer, choose Properties.
3) Select Remote tab.
4) Select the checkbox Allow users to connect remotely to this computer.
5) Click on Select Remote Users. Confirm that the user you want to remote login with.
Step 4. Configure Windows XP firewall
As I used a non-standard TCP port 1234 for the remote desktop web connection, I will also need to configure the firewall on XP.
1) Go to Control Panel > Windows Firewall. Note depending on your view, the path may be Control Panel > Security Center > Windows Firewall.

2) As you can see, the firewall is on. Click on the Exceptions tab.

3) Although, the Remote Desktop service is checked, it is configured for port 3389. You can select the Remote Desktop service and click Edit to confirm.
4) Click Add Port.
5) For the Name, enter Remote Desktop Web Connection. For the Port number, enter 1234. Click OK.

6) The Remote Desktop Web Connection port has now been added

7) Click OK.
Step 5. Connect to an Enabled Remote Desktop Web Connection
To connect to a computer supporting remote desktop web connection
1) Start Internet Explorer and enter http://[ip address]:port/tsweb. In my example I set up remote desktop web connection on my computer call main that has an ip address of 192.168.1.91. The port I configured above was 1234. The url would then be http://main:1234/tsweb or http://192.168.1.91:1234/tsweb.
2) You may notice a prompt at the top of your screen to install Terminal Services ActiveX Client. Click to start the install.

3) You should now see the Remote Desktop Web Connection Window. Enter ip address of the computer you are connecting to and click Connect.

4) You will get a warning message. Click Connect.

5) Enter your User name and Password and click OK.
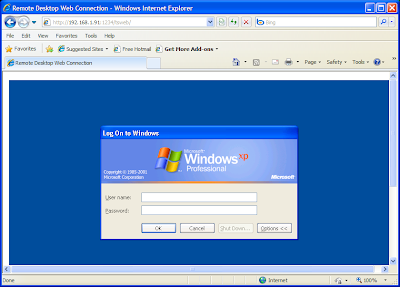
6) You should now see your remote desktop!
The basic steps are:
1) Install Remote Desktop Web Connection
2) Configure Internet Information Services (IIS)
3) Enable Remote Desktop
4) Configure Windows XP firewall
5) Connect to an Enabled Remote Desktop Web Connection
Step 1. Install Remote Desktop Web Connection
1) Go to Control Panel and open Add or Remove Programs.
2) Click Add/Remove Windows Components.

3) Select Internet Information Services, and then click Details.

4) Select World Wide Web Service, and then click Details.

5) Select Remote Desktop Web Connection, and then click OK.

6) Click OK to close Subcomponents of Internet Information Services (IIS) window.
7) Click Next in the Windows Components Wizard window

8) The install starts and shortly after you may be prompted for the XP CD. Click OK and either insert the cd or point to where the files can be found to allow the install to complete.


Step 2. Configure Internet Information Services (IIS)
1) Go to Control Panel > Administrative Tools > Internet Information Services. Note depending on your view, the path may be Control Panel > Performance and Maintenance > Administrative Tools > Internet Information
2) Expand your local computer, expand Web Sites, expand Default Web Site. You should now see a folder called tsweb.

3) Right-click the tsweb folder and then click Properties.

4) Click the Directory Security tab. Click the Edit button in Anonymous access and authentication control.

5) Check the Anonymous access check box on the Authentication Methods dialog box, and then click OK.

6) Click OK to close the tsweb Properties window.
7) Right-click the Default Web Site and then click Properties. As port 80 is a highly-used port and may be used by other software installed on your computer, I recommend changed it to some value between 1000 to 65535. I chose 1234. Change the TCP Port and click OK.

9) If your Default Web Site is Stopped, right-click and then click Start.
Step 3. Enable Remote Desktop
To Enable Remote Desktop to a Windows XP Professional system,
1) Click Start.
2) Right-click My Computer, choose Properties.
3) Select Remote tab.
4) Select the checkbox Allow users to connect remotely to this computer.
5) Click on Select Remote Users. Confirm that the user you want to remote login with.
Step 4. Configure Windows XP firewall
As I used a non-standard TCP port 1234 for the remote desktop web connection, I will also need to configure the firewall on XP.
1) Go to Control Panel > Windows Firewall. Note depending on your view, the path may be Control Panel > Security Center > Windows Firewall.

2) As you can see, the firewall is on. Click on the Exceptions tab.

3) Although, the Remote Desktop service is checked, it is configured for port 3389. You can select the Remote Desktop service and click Edit to confirm.
4) Click Add Port.
5) For the Name, enter Remote Desktop Web Connection. For the Port number, enter 1234. Click OK.

6) The Remote Desktop Web Connection port has now been added

7) Click OK.
Step 5. Connect to an Enabled Remote Desktop Web Connection
To connect to a computer supporting remote desktop web connection
1) Start Internet Explorer and enter http://[ip address]:port/tsweb. In my example I set up remote desktop web connection on my computer call main that has an ip address of 192.168.1.91. The port I configured above was 1234. The url would then be http://main:1234/tsweb or http://192.168.1.91:1234/tsweb.
2) You may notice a prompt at the top of your screen to install Terminal Services ActiveX Client. Click to start the install.

3) You should now see the Remote Desktop Web Connection Window. Enter ip address of the computer you are connecting to and click Connect.

4) You will get a warning message. Click Connect.

5) Enter your User name and Password and click OK.

6) You should now see your remote desktop!
Wednesday, February 17, 2010
Adding Feedjit Widget to my Blogs
Now that I have started writing on a couple of blogs, I am more observant whenever I visit other blog sites and the various widgets that have been incorporated. Whenever I see the Feedjit Live Traffic Feed, I always take a glance to observe where around the globe people are surfing at that moment. So it was time to add to my sites geekwithme.blogspot.com and culinaryaspiration.blogspot.com. I was surprised how easy it was to add the Feedjit widget.

2) Select which blog you want the Feedjit widget to be added. Click ADD WIDGET.

3) Position the widget to the desired place on your webpage. Click SAVE.

4) Now, go check your website to see the live traffic feed.

1) Browse to the Feedjit url http://feedjit.com/joinjs/#. Click Click to Add to Blogger under the Live Traffic Feed

2) Select which blog you want the Feedjit widget to be added. Click ADD WIDGET.

3) Position the widget to the desired place on your webpage. Click SAVE.

4) Now, go check your website to see the live traffic feed.

Tuesday, February 16, 2010
Snagit for Mac (in beta)
If you have ever had to take looks of screenshots in the Windows world, you will surely have heard of Snagit. The biggest reason for using it was the ability to capture screenshots of an entire window even when you had to scroll to see the full screen on your monitor. TechSmith now has a version for the Mac. It is currently in beta and free to use. Even though I can take screenshots using base operating system (see post How to Capture Screenshots in Snow Leopard), I wanted to also perform simple annotations as in the example below.

You can visit the TechSmith site to get your beta copy of Snagit.

You can visit the TechSmith site to get your beta copy of Snagit.
Monday, February 15, 2010
How to Display the Most Recently Installed Software Updates in Mac OS X
In troubleshooting Mac OS X problems, you may want to find out when particular software updates were applied. I will cover 2 ways to do using, the first using the Console and then using Terminal.
In my previous post, I showed how to view system logs using the Console. The process is exactly the same, except that we will be looking for Update.log file.
How to display the most recently installed software updates using the Console
1) Open Console by going to Application > Utilities > Console.app.
2) Using the Menu, go to View > Show Log List.
3) In the left pane, look for FILES > /Library/Logs > Software Update.log and select it.

How to display the most recently installed software updates using Terminal
1) In terminal, type tail -n 10 /Library/Logs/Software\ Update.log and hit Enter. This will display the 10 most recently installed software updates.

Friday, February 12, 2010
How to View System Logs in Mac OS X
Let's say you wanted to look at you installation log, how can you do this?
1) Open Console by going to Application > Utilities > Console.app.
 2) Using the Menu, go to View > Show Log List.
 3) In the left pane, look for Files > /private/var/log > install.log and select it.
4) In this example, you can see that I installed Snagit Beta.
 5) Feel free to explore what other logs might be available and of use to you.
1) Open Console by going to Application > Utilities > Console.app.


4) In this example, you can see that I installed Snagit Beta.

Thursday, February 11, 2010
How to Change the Folder's Icon in Mac OS X
In my previous post Place Most Frequently Used Folders in OSX Dock, I placed several of my most frequently used folders in the dock. In order to help distinguish the folders, I changed the icon for each of the folders.
To change the icon for a folder:
1) Navigate to the icon file you want to stamp on the folder and click to select it. Note that you can also select any other existing volume, application, folder or file that has an icon you want to copy.
2) Perform a Get Info (Command-i or File > Get Info or Right-click > Get Info).
3) Click the icon in the upper-left corner of the Get Info window, and copy the icon (Command-c or Edit > Copy).

4) Navigate to the folder whose icon you want to replace. Perform a Get Info (Command-i).

5) Click the icon in the upper-left corner to select it.
6) Replace the icon (Command-v or Edit > Paste).

Wednesday, February 10, 2010
Place Mostly Frequently Used Folders in OS X Dock
As with most people, there are a few folders on my Mac that I use all the time. To save myself a few clicks, I used to leave the folders on my desktop. After awhile, chaos would ensue and my desktop would be need of a spring cleaning. Now, I have re-located my most used folders to my dock. It's really easy! All you need to do is drag your folder to the dock. Once there, you can adjust to display as a Folder or a Stack with the content in a Grid or List. You basically have the same controls as with the Downloads folder already on your dock.
Tuesday, February 9, 2010
Mac 101
If you are still new to the Mac and want a little help getting started, you don't need to buy a book. Instead Apple has put together a course consisting of 27 lessons to get you going.
| Lesson | Lesson Topic | Lesson Description |
|---|---|---|
| 1 | Mac Essentials | Did you know that your Mac is smart enough to update its own software? Or that dragging a CD or DVD to the Trash is an absolute necessity? Or that your Mac can store all your passwords on a Keychain? Or that everyone who shares your Mac can have his or her own user account? No? Then start here. |
| 2 | Address Book | Keep your friends, family, and foes close by preserving and managing their contact details in Address Book. |
| 3 | Automator | Wouldn't it be nice to have your own personal robot that could take care of all the nitty-gritty, repetitive tasks you do each day? Meet Automator. |
| 4 | Boot Camp | Run Windows XP and Vista at native speed on your Mac! Boot Camp Assistant automatically sets up your hard drive, leaving all your Mac data in place, while creating a separate partition for Windows. Boot Camp even burns a disc of all the drivers you’ll need and automatically installs them as part of the Windows installation. |
| 5 | Dashboard | Like desktop toys and tools? Dashboard is a cool feature of Mac OS X 10.4 or later that lets you get quick access to a world of widgets at the press of a key. |
| 6 | Dictionary | Need to find the meaning of life? Look it up in Dictionary! Whether you seek word spellings, meanings, or synonyms, knowledge is right at your fingertips. |
| 7 | DVD Player | You know what they say about all work and no play. For those times when you feel like being a couch (or office chair) potato, DVD Player gives you a front row seat to the movies. |
| 8 | Expose | If you find yourself buried in windows and application interfaces, Exposé is a nifty tool that can help you access windows instantly and effortlessly. |
| 9 | Font Book | Got fonts? Font Book makes it easy to manage your font collection, and provides tools that take the pain out of working with them. |
| 10 | GarageBand | Whether you're a musical virtuoso or don't know a quarter note from a keynote, GarageBand enables you to make music—with or without real instruments. |
| 11 | iCal | Forget jotting down appointments and to-do lists on sticky notes and calendars. iCal can help you get a handle on everything in your—and anyone else's—life. |
| 12 | iChat | Long distance phone bills and text messaging charges can be a thing of the past. With iChat, you can text, audio, and video chat with others using your Internet connection. |
| 13 | iDVD | Ready to share your movie masterpiece? iDVD features all the tools you need to create professional-looking DVDs that rival movie studio releases and play in any DVD player. |
| 14 | iMovie | If you've got a DV camera or digital still camera that can capture movies, iMovie lets you don the director's cap and edit movies like a pro—even high-definition video. |
| 15 | iPhoto | For the shutterbug in all of us, iPhoto allows you to easily view, edit, and share your digital photos. You can even create slideshows and your own photo books. |
| 16 | iSync | If you're an on-the-go, gadget-toting individual, iSync enables you to sync contacts, schedules, and other data on your Mac across your collection of cell phones, iPods, and Palm devices. |
| 17 | iTunes | If you like music, you'll love iTunes—a fully integrated music playing, buying, burning, converting, streaming, and so-much-more application. |
| 18 | iWeb | Build a beautiful website in minutes. Use iWeb to create websites and blogs - complete with podcasts, photos, and movies - and get them online, fast. |
| 19 | Get smart about your email. Mail not only lets you send and receive email, it can track and manage your messages, and eliminate junk mail too. | |
| 20 | Preview | PDF viewing got a whole lot better with Preview, a PDF viewer that does more than simply show you the document. You can search for and copy text, view photo and fax files, play slideshows, and more. |
| 21 | QuickTime Player | QuickTime is the digital media standard when it comes to playing just about every flavor of audio, video, and image file format. If accessing online multimedia is your goal, QuickTime Player will get you there. |
| 22 | Safari | Get the most out of your web experience with Safari. This web browser offers plenty of features to make your Internet activity more efficient, including fast page loads, built-in Google search, pop-up window blocker, and AutoFill automation. |
| 23 | Spaces | With Spaces you can group your application windows and banish the clutter from your desktop. Create custom spaces for work, play, or your creative muse. Switch between spaces with just a click or keypress. |
| 24 | Spotlight | If you're searching for stuff on your Mac, look no further than Spotlight, an incredible search technology that can search for anything that you type and return results at blazing speeds. |
| 25 | TexEdit | You don't necessarily need a pricey word-processing application to take care of your text needs. TextEdit provides text and formatting tools, graphics and movie handling, spell check, and can even speak your text back to you. |
| 26 | Time Machine | Lost a file, or saved over that really important presentation? Wish you could go back in time to retrieve it? Use Time Machine to restore files from automatic backups. |
| 27 | VoiceOver | For those with visual or learning disabilities, VoiceOver provides a spoken English interface that makes it easier to get around the Mac. |
Monday, February 8, 2010
Show Folder Sizes in Finder in Leopard and Snow Leopard
By default when using Finder, you can only size the size of files but not folders. At times it can be very useful to see where most of the space on your drive is being consumed. Having folders sizes tagged to the folders can help this task.


As you can see the folder size calculations has started. That's it!

This is my default finder view.

As you can see there is no information for the folder sizes. To enable this feature, you need to be in either List View or Cover Flow View. Then select View > Show View Options. This will present options we can change. Select the checkbox Calculate all sizes.

As you can see the folder size calculations has started. That's it!

Friday, February 5, 2010
Backing Up My Calendars
In my previous post, I manually backed up my Address Book. I also do the same for my calendars for the same reasons.
To back up your Calendars,
1) Open iCal.
2) Select File > Export > iCal Archive.
3) You will be presented with a default name for your archive file and a default location. If you prefer, change to suit your needs. Click Save.
To back up your Calendars,
1) Open iCal.
2) Select File > Export > iCal Archive.
3) You will be presented with a default name for your archive file and a default location. If you prefer, change to suit your needs. Click Save.
Thursday, February 4, 2010
Backing Up My Address Book
I am using Time Machine, but I still back up my Address Book. Why you ask? First, I am not really sure how to restore my Address Book using Time Machine. It is probably simple, but I have never checked. Second, I sync my contacts with Google contacts on a regular basis. For my comfort level, I take a manual backup.
To back up your Address Book,
1) Open Address Book.
2) Select File > Export > Export Book Archive.
3) You will be presented with a default name for your archive file and a default location. If you prefer, change to suit your needs. Click Save.
To back up your Address Book,
1) Open Address Book.
2) Select File > Export > Export Book Archive.
3) You will be presented with a default name for your archive file and a default location. If you prefer, change to suit your needs. Click Save.
Wednesday, February 3, 2010
Accessing a FTP Server from Ubuntu 9.04
In a couple of recent posts, I showed how to quickly set up a FTP on both a Mac (How To Set Up A FTP Server on a Mac) and a Ubuntu 9.04 desktop (How To Set Up A FTP Server on Ubuntu). This post will show you how to access these or any other FTP servers using native Ubuntu 9.04 software. If you are going to use ftp on a frequent basis, it is worth investigating what added capability and ease of use third-party software might provide.
Accessing a FTP Server from Ubuntu 9.04
1) Go to Places > Connect to Server.

2) Change the Service type from Public FTP to FTP (with login). Fill in the field for Server. Click Connect.

3) Select the checkbox Connect as user. Fill in the fields for Username and Password. Click Connect.

4) You have now successfully connected to the FTP Server! You can now drag and drop files to the FTP Server. As we did not specify a folder in the previous step, we are dropped into the root folder.

This solution works well enough for me that I do not yet plan on installing a third-party product.
Tuesday, February 2, 2010
Accessing a FTP Server from Windows XP
In a couple of recent posts, I showed how to quickly set up a FTP on both a Mac (How To Set Up A FTP Server on a Mac) and a Ubuntu 9.04 desktop (How To Set Up A FTP Server on Ubuntu). This post will show you how to access these or any other FTP servers using native Windows XP software . If you are going to use ftp on a frequent basis, it is worth investigating what added capability and ease of use third-party software might provide.
Accessing a FTP Server from a Windows XP Pro
1) Using Windows Explorer, type ftp://[ip address] in the Address bar.

2) As you did not enter any credentials, you will receive a FTP Folder Error. Click OK.

3) Select File > Login As.
4) Type in the User name and Password. Click Log on.

5) You are now successfully logged in! You can now drap and drop file to and from using the FTP connection.

Note:
1) If instead you type in ftp://[username]@[ip address] in step 1, you will be taken to step 4 directly. For example ftp://keith@192.168.1.106.
2) If instead you type in ftp://[username]:[password]@[ip address] in step 1, you will be taken to step 5 directly. For example ftp://keith:keithpassword@192.168.1.106.
Subscribe to:
Comments (Atom)


