Thursday, December 31, 2009

Using Your Windows 7 System Repair Disc

To use the Windows 7 System Repair Disc you created (see post How to Create a Windows 7 System Repair Disc):
1)  Insert the Windows 7 system repair disc into the CD/DVD drive.
2)  Boot your computer and choose to boot from CD/DVD drive.
3)  You will get the message to Press any key to boot from CD or DVD.  Hit any key.
4)  You will see a message indicating that Windows is loading files....You will get a System Recovery Options window.  You may need to change language and keyboard.  For me, English (United States) and US was selected by default.  Click Next.
5)  It will then search for Windows installations.  I had one Windows 7 installation and could now use the recovery tools to help fix any problems starting Windows by clicking Next .  Note that there is another option that allows you to restore your computer using a system image that you might have created earlier.  See post on how to Create a Backup Drive Image.
6)  You will now be presented with several recovery tools to choose from.  The tools include Startup Repair, System Restore, System Image Recovery, Windows Memory Diagnostic and Command Prompt.

Wednesday, December 30, 2009

How to Create a Windows 7 System Repair Disc

If you bought a laptop with Windows 7 already installed you may not have received an installation disc.  In this case, it would be wise to create a system repair disc.

To create a system repair disc,

1)  Click Start and choose Control Panel.

2)  Click System and Security and then Backup and Restore.

3)  Click Create a system repair disc.

4)  If you have only one CD/DVD that can write a disc, then it will automatically be selected.


5) Insert a blank disc and select Create disc.  Once the disc is created, I highly recommend verifying that it works.


6)  Click Close.

Tuesday, December 29, 2009

Create a Backup Drive Image using Windows 7

When you think of taking a drive image, Symantec Ghost and Acronis True Image come to mind.  Both these products are not free.  My experience is primarily with Ghost (both corporate and home versions).  There are also open-source alternatives such as Clonezilla.  However, did you know that Windows 7 comes with built-in functionality to create an image of a drive?

To create a system image:

1)  Click Start and choose Control Panel.

2)  Click System and Security and then Back up your computer.


3)  Click Create a system image.


4)  Choose where to save the backup image.  Then click Next.


5)  Click Start backup and wait for it to complete.  The length of time will depend on how much data needs to be backed up.

Monday, December 28, 2009

Data Backup on Windows using SyncBack Freeware

For backing up my data on Windows, I use SyncBack Freeware.  SyncBack Freeware is available from 2BrightSparks.  Although there are paid versions with additional functionality, my requirements are totally satisfied with this version.  The most important requirement is the ability to backup my data (e.g. photos, music, personal files) to external drives.  You can optionally synchronize your files to a hard drive (local, external, networked), CD, FTP or Zip archive.

SyncBack Freeware is intuitive and you can get started in a flash.  SyncBack helps you quickly set up backup jobs using default starter profiles.

A sampling of the profiles I use:


Profile Example - Easy Setup Options


Profile Example - Expert Setup Options

Wednesday, December 23, 2009

How To Determine Which Group A Contact Belong To in Address Book?

You have just merged or cleaned up your Address Book in Mac OS X, and now you want to confirm whether a contact is in the correct group(s).  To determine which group or groups a contact is currently in, select the contact and then press and hold the Option key.  The group(s) will be highlighted.

Tuesday, December 22, 2009

Zooming Your Screen in Mac OS X

You are surfing on Safari and there is a small image that you can't see clearly. Or maybe you are doing a demo for some co-workers and they cannot see the pop-up window from where they are standing. If you had the ability to get a closer look at a portion of your screen that could be extremely useful. Mac OS X provides a built-in Zoom feature.

The Zoom feature is off by default.  To enable, go to System Preferences > Universal Access.


To zoom in, press Command-Option-=
To zoom out, press Command-Option-hyphen.

There are additional configuration options by clicking the Options button available:


Monday, December 21, 2009

Backing Up My Blogger Blog

In my previous post, I noted that Data Liberation provided a way for me to back up this blog.  They propose that I can use the export function to create a backup of my blog.  I do believe that it will capture all the texts and comments of the post, but I am not sure that it will capture any of my images.  In addition, I believe I will still need to take a copy of my blog template.

I have decided to implement the following backup plan:
1)  Full backups using HTTrack website copier.  As an alternative, you can also use the export function within Blogger plus take copy of blog template.
2)  Incremental backups using the BlogSend Address  and Comment Notification Email features within Blogger.

BlogSend Address
Under Settings > Email & Mobile, there is a BlogSend Address that can be used to automatically send blogs posts to my email address whenever they are posted.  I can use a filter to automagically file them into folders.

Comment Notification Email
Under Settings > Comments, there is a Comment Notification Email whenever someone leaves a comment on the blog.

Friday, December 18, 2009

Data Liberation of Google Data

When I first started writing, my intention was to capture tips on tools that I experimented with in Windows, Mac and Linux environments.  Little did I know that just over a month after I began, about half my posts are Google-related.  It seems that Google is constantly releasing new products or adding significant features to their existing products.  I am extremely happy that Google is providing products that intrigued me enough to give them a try.  In doing so, Google is capturing more and more of my personal data......and that worries me!  Can I trust Google with their "Do no evil"?  Maybe I CAN or maybe I CAN'T!

I started to think more about all my data scattered in various Google products.  As a reminder, all I need to do is revisit my post on Google Dashboard to give me a quick summary.  I am heavily invested in Gmail, Google Calendar, Google Docs and now Blogger.  I know that I have some of my data backed up locally, but definitely not all.


I came across a website called Data Liberation that was founded by members of an engineering team at Google.  Their singular goal is to make it easier for users to move their data in and out of Google products.  

For most of their products, there is documentation on how to help free my data from Google should I wish to do so.  My current intentions is not to migrate my data elsewhere (at least not yet) but rather to find a way to back up my data.

Thursday, December 17, 2009

Google Chrome Extensions

Just as with Firefox, extensions are now available for Google Chrome on Windows and Linux.

In order to start using, you will need Google Chrome beta.   The version I installed on Windows 7 was 4.0.249.30.  Click on the extensions link.  You will be presented with a list of extensions to choose from.


I choose Google Mail Checker to start with.


You can now click the Install button.


Click Install in the Confirmation Installation window.  Once the install is completed, you will see a Gmail icon at the top right of the browser.


You can continue installing as many extensions as you want.  As these extensions are not yet mature, they may not be stable and may even be memory hogs.

Wednesday, December 16, 2009

Startup key combinations for Intel-based Macs

The table below lists what will happen when the following keys are pressed during startup:

Keystroke Description
C Start up from a bootable CD or DVD
D Start up up in Apple Hardware Test (AHT) if the Install DVD 1 is in the computer.
Option Starts into Startup Manager, where you can select a Mac OS X volume to start from
Eject, F12 or hold mouse button Ejects any removable media, such as an optical disc
N Attempt to start up from a compatible network server (NetBoot)
T Start up in FireWire Target Disk Mode
Shift Start up in Safe Boot mode and temporarily disable login items
Command-V Start up in Verbose mode
Command-S Start up in Single-User mode
Option-N Start from a NetBoot server using the default boot image
Option-Command-P-R until you hear two beeps Reset NVRAM

Tuesday, December 15, 2009

Resetting administrator password on a Mac

Assuming you have forgotten your administrator password, the most common way to reset is with the help of the Mac OS X Installation disc.

To reset the administrator password using the Mac OS X Installation disc:
1) Insert the disc into the computer, and double-click the Install Mac OS X icon.
2) In the Installer, click Utilities, and then click Restart
3) When the Language Chooser appears, select your language, and then click the Continue button (looks like an arrow)
4) In the Installer, choose Utilities > Reset Password
5) Follow the onscreen instructions to change the password.
6) Once you reboot and log back in, be sure to change the password for your login keychain to match your new account password so your keychain is unlocked when you log in.

If you don't have the Mac OS X Installation disc handy, you can use these steps instead:

1. Restart in Single User mode (hold Command-S during startup). Note that single-user mode always uses the US English keyboard layout.
2. At the prompt, type this followed by Return: mount -uw /
3. Type launchctl load /System/Library/LaunchDaemons/com.apple.DirectoryServices.plist and press Return.

4. Type ls /Users and then press Return.
5. Look at the listing and note the short name (username) of the affected user account.
6. Type dscl . -delete /Users/username AuthenticationAuthority and press Return.

Note: Replace "username" with the affected user account's short name you noted above.

7. Type passwd username followed by Return.

Note: Replace "username" with the affected user account's short name you noted above.
8. At the "New password:" prompt, type the user's password, then Return. Note: It is recommended that the original user's password be used to match the keychain password.
9. At the "Retype new password" prompt, type the same password, followed by Return.
10. Type reboot followed by Return.

Monday, December 14, 2009

Starting up in Safe Mode on a Mac

These instructions were taken from a couple of help articles on the Apple site.

Starting up in "safe mode" may help you diagnose problems you're having with your computer.

To start up in safe mode:
1) Shutdown your computer and wait 10 seconds.
2) Press the power button.
3) Immediately after you hear the startup tone, hold down the Shift key. You should press the Shift key as soon as possible after you hear the startup tone, but not before.
4) Release the Shift key when you see the gray Apple logo and progress indicator (spinning gear).

To leave safe mode, restart the computer normally without holding down any keys during startup.

What does Safe Mode do:
1) It forces a directory check of the startup volume.
2) It loads only required kernel extensions (some of the items in /System/Library/Extensions)
3) It disables all fonts other than those in /System/Library/Fonts.
4) It moves to the Trash all font caches normally stored in /Library/Caches/com.apple.ATS(uid)/, where (uid) is a user ID number such as 501
5) It disables all startup items and logins items.
6) A Safe Boot deletes the dynamic loader shared cache at (/var/db/dyld/). A cache with issues may cause a blue screen on startup, particularly after a Software Update. Restarting normally recreates this cache.

Taken together, these changes can help resolve software or directory issues that may exist on the startup volume.

Some features may not work in Safe Mode:
1) DVD Player, capturing video in iMovie, audio input or output device
2) Quartz Extreme (hardware accelerated graphics) is disabled. Any applications dependent on this will not work.
3) In Snow Leopard, File Sharing access is disabled. This means you will not be able to mount Time Capsule or any volumes being served by other Macs.

Friday, December 11, 2009

Burning an .ISO file on a Mac

As I often burn .iso file as a file on a disk rather than as an image, I thought I should capture the correct process for myself to avoid creating too many coasters.

To burn the .iso file to CD or DVD on a Mac using Disk Utility,
1) Launch Disk Utility (Applications > Utilities > Disk Utility)
2) Insert a blank CD or DVD
3) Drag and Drop your .iso file to the left pane in Disk Utility
4) Select the .iso file you dropped in the left pane, and click the Burn icon


5) A confirmation dialog box will be presented.  Click the the Burn button in the dialog box to start the burn process.
6) Another dialog box will pop up showing the progress until its completion.

Thursday, December 10, 2009

How to capture screenshots in Windows 7

If you are going to do any documentation on Windows 7, you will need some way to capture screenshots.  One way is to use the Snipping Tool built into Windows 7.  In addition you can also annotate the screenshots to guide the user to focus where you want them to. 


By clicking on the New drop-down, there are 4 types of snips that is presented as options:
1)  Free-form Snip 
2)  Rectangular Snip
3)  Window Snip
4)  Full-Screen Snip

After you capture a snip, it Snipping Tool Clipboard opens up with your capture.  From here, you can now annotate to your heart's desire.

Wednesday, December 9, 2009

Google Dictionary

In the past, if I wanted to find out what a word meant I would either use the define: Google search operator or search for a dictionary and plop in the word.  Now, I will be off to the Google Dictionary instead.

As an example, I chose the word parfait that is meaningful both in English and French.

Using the English dictionary,


Using the French dictionary,


Using the French to English dictionary,


The most interesting results were from the French to English dictionary.  There were sound bites to help pronounce synonyms.  There were also related phrases in both languages.   I wonder what else I might find!

Tuesday, December 8, 2009

Google Public DNS - To Use Or Not To Use

Google launched a DNS resolving service called Google Public DNS.  Google stated that using their DNS resolving service instead of your ISP's will improve page loading time.  I currently use a combination of OpenDNS's and my ISP's.  First, having multiple name servers from different providers gives me redundancy.  Second, having OpenDNS listed before my ISP's provides a safer environment while my kids surf the net.  It never crossed my mind that perhaps speed should also be a consideration.

If I were to use Google Public DNS,
1)  It could provide additional redunancy.
2)  I would lose the benefits of OpenDNS if the Google Public DNS was listed ahead of OpenDNS.
3)  I would garner the benefit of a faster web experience (according to Google).  Their benchmarks show that their DNS to be faster.

Is there a way that I could easily confirm these benchmarks?  Google used GRC's Domain Name Speed Benchmark Tool and as it turns out it is available for anyone to use.  The tool was easy to use.  The Nameservers were already listed.  All that you need to do was press Run Benchmark and wait for the results.  I ran a test last night to see if I got similar results to what Google posted.


OpenDNS servers are 208.67.222.222 and 208.67.220.220.
Google Public DNS servers are 8.8.8.8 and 8.8.8.4.

Based on the above benchmark,
1)  My ISP easily beat both OpenDNS and Google Public DNS.  I guess this should not be a surprise as they have the closest DNS to me.
2)  OpenDNS was faster than Google Public DNS.

Bottom line, Google Public DNS is not faster for me (based on this one test).  What I did learn is that I should re-configure my network settings to use my ISP's DNS first.  For my kids, I could statically define the DNS they use to be OpenDNS.  When Google Public DNS becomes faster for me or they provide additional functionality, I would revisit.

Just to be sure, I will re-run the benchmark to see if there is any difference.

Monday, December 7, 2009

Renaming a Virtual Machine in VMware Fusion 3

By default, when you create a virtual machine in VMware Fusion 3, the name of the machine in the library consists of the operating system name.  You could add some description in the Notes field to help remind you what the virtual machine is.  How boring!  There is a way to rename the virtual machine, but unfortunately not via the gui.

To rename a virtual machine:
1) Power off (not suspend) the virtual machine.
2) Using Finder, navigate to /Users//Documents/Virtual Machines.  You should see a list of your virtual machines.  Control-Click the virtual machine and the click Show Package Contents.
3) Scroll and find the .vmx file.  There should only be one.  Open the file using TextEdit or some other text editor.
4) Search for displayName.  For example you may see displayName = "Windows XP Professional".  You can change Windows XP Professional to whatever you want.  Save file and exit the text editor.
5) For clarity, I would also rename the Windows XP Professional.vmwarevm file in /Users/Documents/Virtual Machines to something more meaning to match the descriptive name.
6) Back in VMware Fusion, delete the virtual machine from the Virtual Machine Library.
7) Add the renamed virtual machine into the Virtual Machine Library by File > Open.  Navigate to and select renamed vmwarevm file in /Users//Documents/Virtual Machines.  You will be prompted to answer if the virtual machine was move or copied.....answer I copied it.

Friday, December 4, 2009

How to Capture Screenshots in Snow Leopard

When I first started on the Mac, I always had to look up how to take screenshots as I could never remember the keyboard shortcuts.

Command-Shift-3   will take a screenshot of your entire screen at that moment

Command-Shift-4   will bring up a cross-hair icon showing the screen co-ordinates.  When you click the mouse, that sets the top left corner and when you release the mouse that sets the bottom right corner.

Command-Shift-4, followed by the Space Bar, then clicking a Window   will take a screenshot of the selected window.

All screenshots are saved as .png files on your desktop.

If you combine the Control with the above (e.g. Command-Control-Shift-3), the screenshot will be placed on your clipboard rather than captured as a file on your desktop.

The commands work the same in Tiger and Leopard.

Thursday, December 3, 2009

Google's Chrome OS in VMware Fusion

 In my last post, I covered How To Install Google's Chrome OS to USB.  I saw that someone at gdgt has already installed Chrome OS into a VMware image.  I wanted to give a whirl to see if there was any differences to the USB version.  It will also be useful to have it as a virtual machine to play with.

How to install and run Chrome OS in VMware Fusion:
1)  Download the Chrome OS VMware image from gdgt.  You will need to be a registered member to download.  It is free to register.
2)  From the VMware Fusion toolbar, select File > New
3)  Click Continue without disc

4)  Select Use an existing virtual disk


5)  Navigate to the chrome os vmware file downloaded in step 1.  Select Make a separate copy of the virtual disk and click Choose.


6)  Click Continue.


7)  Choose Linux as the Operating System and Other Linux 2.6.x kernel as the version, and then click Continue.


8)  Click on Customize Settings.


9)  Change the Save As name to Chrome OS and click Save.


10)  Watch as disk is copied.


11)  Change some settings before starting virtual machine.  Click on Network.


12)  Change Network setting to Connect directly to the physical network (Bridged) and click Show All.


13)  Change memory to 512M and click Show All.


14) Start the virtual machine.  Log in using your gmail id and password.


15) Screenshot of the application page.


16)  Screenshot of the networking options at the top right.


17)  Screenshot of the Chrome options.


18)  Screenshot of the Chromium OS version.

Wednesday, December 2, 2009

How to Install Google's Chrome OS to USB

Why stop at installing and playing with Google's Android!  It came to my attention today that I can install Chrome OS to a USB drive and boot from it.  It's actually Chromium OS not Chrome OS.  Chromium OS is the open source version of Chrome.

Credit goes to Hexxeh who put together a Chrome OS Diet USB Version.  The directions  for this appeared very simple and I was able to install without any issue.

How to install and run Chrome OS:
1)  You need to get the Chome OS Diet USB Version.  There are links on Hexxeh's website to download the image using either a torrent or http mirrors.
2)  You need a USB stick to install Chrome OS on.  The USB stick must be at least 1GB.  I used an Apacer Steno 1GB stick.

3)  Follow the instructions  on Hexxeh's website for writing the Chrome OS image to USB.  There are instructions to do so using Windows, Mac and Linux.  I followed the Windows instructions.
4)  You need a netbook or laptop.  See the current list of supported hardware.  I did not have any of the hardware listed.  Remember that Chrome OS is still in development and won't be released till next year.  I decided to try it on a MSI Wind U100 Netbook.  All I needed to do was plug in a USB stick and when powered on, it booted directly into Chromium OS logon screen.  The bios on my netbook was already configured to first boot from usb before the hard drive.  You may also see an option to display the boot menu during the boot process.  This will allow you to temporarily change the boot option.
5)  Enter facepunch for both the username and password to log in.  You are now in Chrome OS.

 Some initial observations:
1)  Ethernet worked right away while wi-fi did not.  As far as I know this is not working yet.
2)  The trackpad also worked, as did a mouse.
3)  If you have used the Chrome browser before, then that's basically what you get with Chrome OS (at least for now).
4)  If you click the chrome symbol at the top left of the screen, it takes you to a list of different web-based applications including Gmail, Hotmail, Yahoo! Mail, Google Calendar, Google Reader, Google Docs, You Tube, Picasa Web, Hulu, Lala, Pandora, Contacts, Calculator, To-do list, Calendar Panel, Books, Chess, Facebook and Twitter.

Tuesday, December 1, 2009

How to Install Google's Android OS in VMware Fusion 3

I am very curious about all the stuff Google has their hands in.....including Android.  From all that I have heard, Android has a lot of promise but I am not ready to pick up a phone with Android on it.  The iPhone is still the sexy one to own!

There is one Android open source project called Android-x86 that I found that is active and making great strides.  I installed this version to learn more about Android.  Here's how to install Android OS into VMWare Fusion 3.

1)  Download the Android-x88 iso file.
2)  From the VMware Fusion toolbar, select File > New
3)  Click Continue without disc


4) Select Use operating system installation disc image file and then navigate to the android iso file, then click Continue


5) Choose Linux as the Operating System and Other Linux 2.6.x kernel as the version, and then click Continue.


6)  Change the memory to 512M if your system has enough memory to allow this.
7)  Change the hard disk to IDE.  To do so, first delete the one created by default.  Then add a new one and be sure to change the Bus Type to IDE and adjust the Disk size to 8 GB.  Click Apply.


8)  Start the Android virtual machine.  Select the option to install to hard disk.


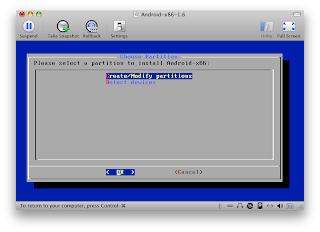
9)  As we started with a clean disk, we need to create a partition to install.


10)  This is the most complicated screen.  First select New > Primary > Full Size of disk > Bootable > write > yes > Quit.


11)  Choose the sda1 Linux partition you just created and click OK.


 12)  Choose the filesystem ext3 and click OK.

13)  Confirm format of sda1 to ext3 by clicking Yes.


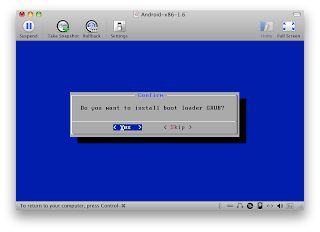
14)  Click Yes to install GRUB boot loader.


15)  You should now get the Congratulations screen.  Choose Run Android-x86 and click OK.

16)  Once Android has booted, you should now see the initial screen.

17)  As a quick test, I used the browser to get to foodgawker.com and it worked!
18)  Time to play with Android!